More and more organizations are implementing Microsoft 365 products and services. As a result these organizations are utilizing Azure AD as their identity platform for Microsoft Services, however many are forgetting that their Azure AD credentials (identity) can also be used with other third-party services as well. Integrating third-party applications with Azure AD allows users to leverage third-party applications and services with a single identity. Additionally many applications support automatic user provisioning, meaning that Azure AD can automatically configure these applications or services automatically for both new and existing users. Another advantage of integrating third-party applications with Azure AD is security. Microsoft 365 has a large security portfolio and integrating third-party applications with Azure AD allows us to extend these protections to third-party applications.
In this post we will integrate Dropbox Business with Azure AD, configure User Provisioning (our users will be automatically provisioned/deprovisioned in Dropbox Business), configure Single Sign On (SSO) and look at the advantages of enabling Self Service. Finally we will look at securing these application with Conditional Access. These steps are applicable for any application that supports Azure AD integration. Sign up for a Dropbox Business trial to follow the steps in this post. Note that some elements in this guide does require an Azure AD Premium license.
Contents
Azure AD Application Registration
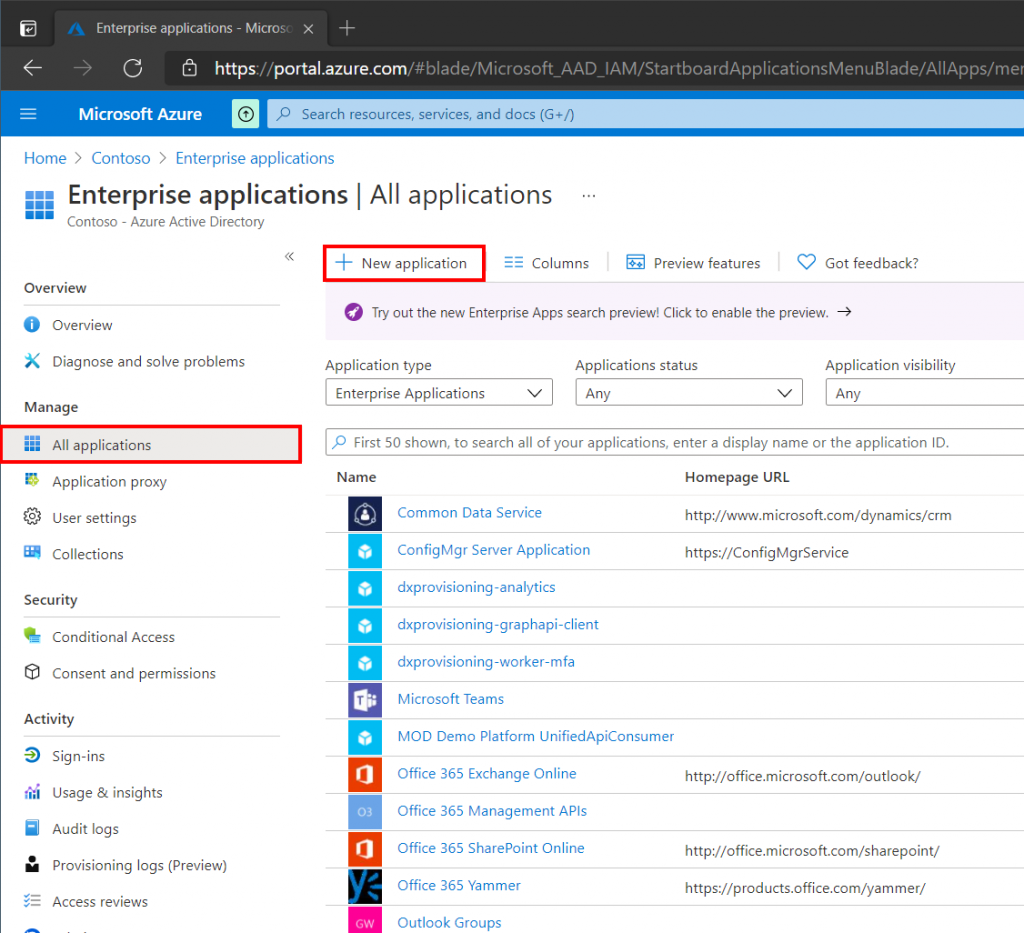
To begin we need to register an Enterprise Application (service principal) in Azure AD. Open the Enterprise Applications blade in Azure AD and select New Application to browse the Azure AD Gallery.
Microsoft defines a service principal (or Enterprise Application) in Azure AD as the local representation, or application instance, of a global application object in a single tenant or directory. The service principal defines who can access that particular application and what kind of permissions it has.
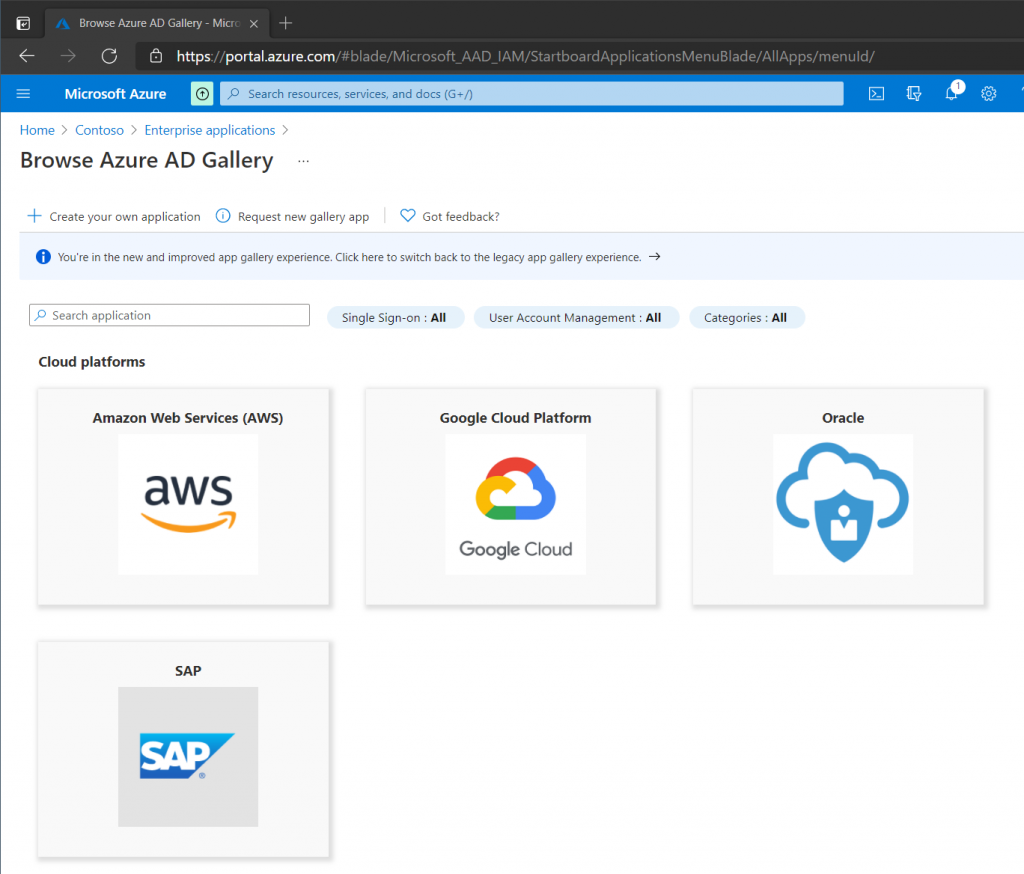
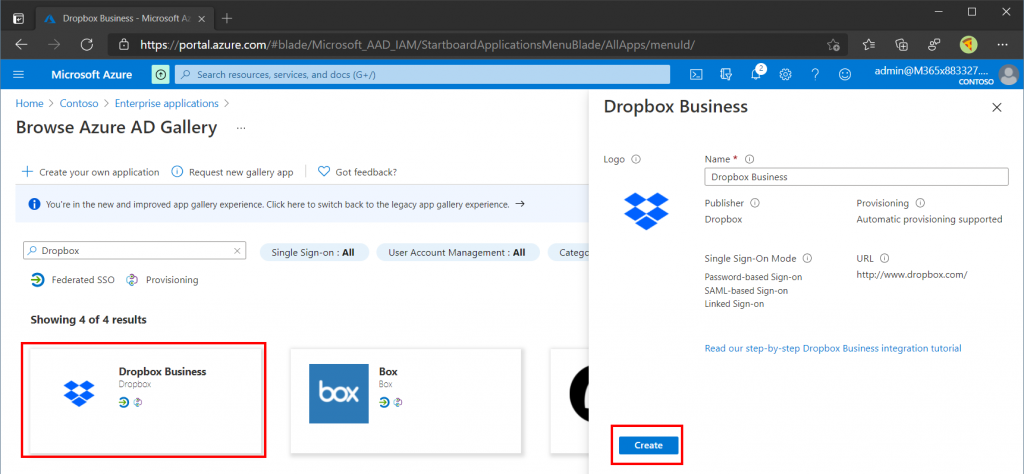
The Azure AD Gallery contains more than a thousand predefined apps to integrate directly into Azure AD. If the application you are trying to integrate into Azure AD is not listed then simply click the Create Your Own Application button. Dropbox Business is already part of the Azure AD Gallery so search for that.
Select Dropbox Business in the search results, Give the application a name and click Create. Note the Step-by-Step instructions tutorial that is available for most applications (in the event you a setting up a different application).
Our Dropbox Business application should now be created and visible under All Applications in the Enterprise Applications blade.
Single Sign On (SSO)
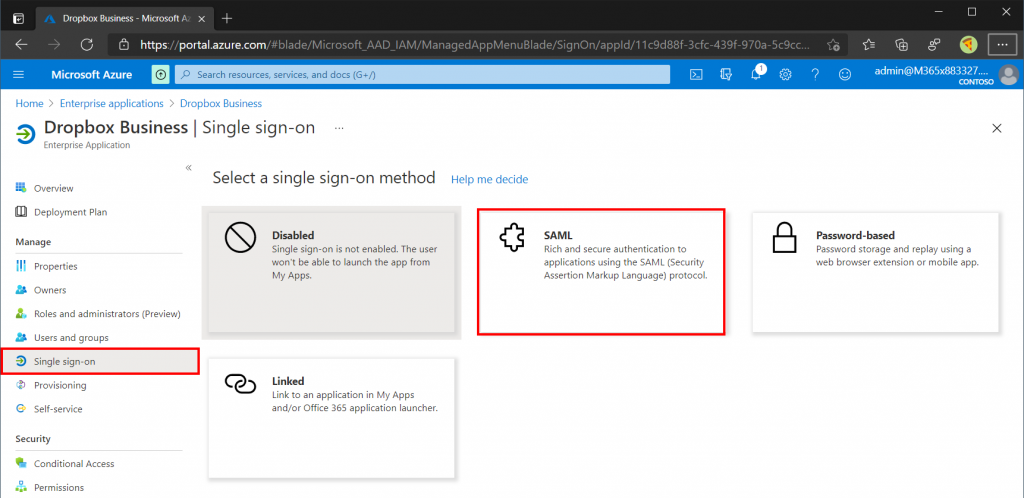
Open the Dropbox Business application from the Enterprise Applications blade and select Single Sign On (SSO). For the Single Sign On method select SAML (Security Assertion Markup Language).
SAML Step 1
In order to get Single Sign On (SSO) to work we need to specify a few things both on the Azure AD and Dropbox side. The configuration provided here will be specific for Dropbox Business so if you are working with another application reference its documentation (or click the link to the step-by-step tutorial as mentioned earlier). First we need to retrieve the Reply URL and Sign On URL from the Application provider.
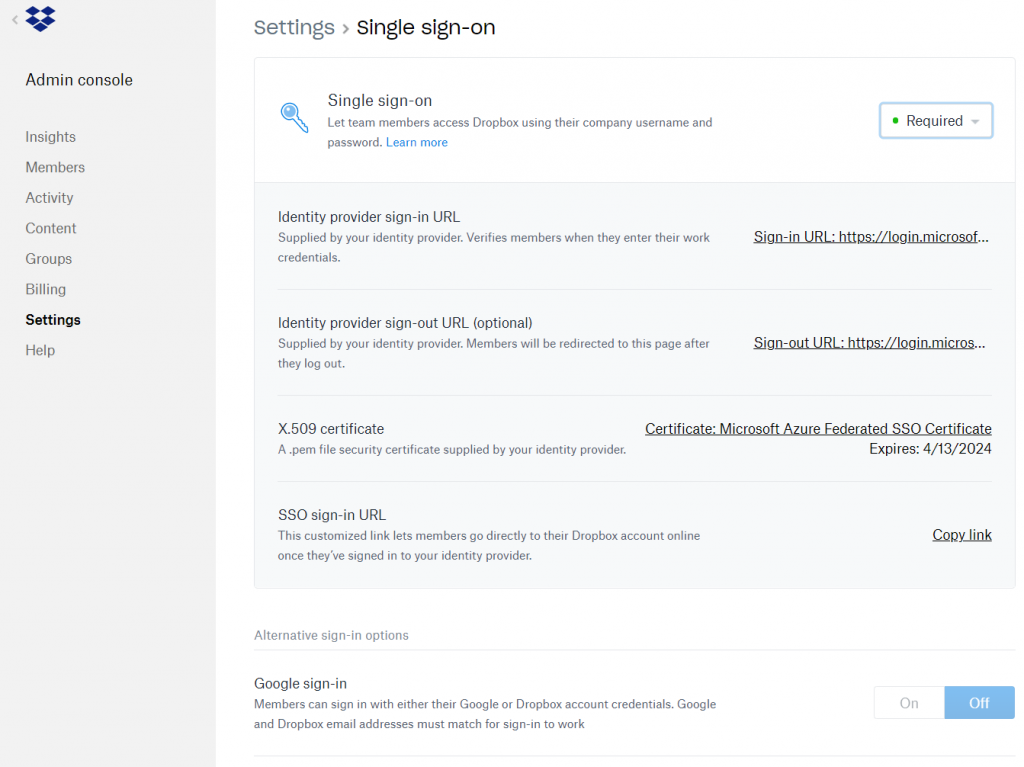
The Sign on URL for Dropbox Business can be found in the Dropbox Business Admin Console by performing the following steps:
- Open then Dropbox Business Admin Console
- Select Settings
- Select Single Sign On
- Enable Enable Single Sign On (mine will be set to Required)
- Copy the SSO Sign-in URL
Sign on URL – https://www.dropbox.com/sso/xxxxxxxx
Reply URL – https://www.dropbox.com/saml_login
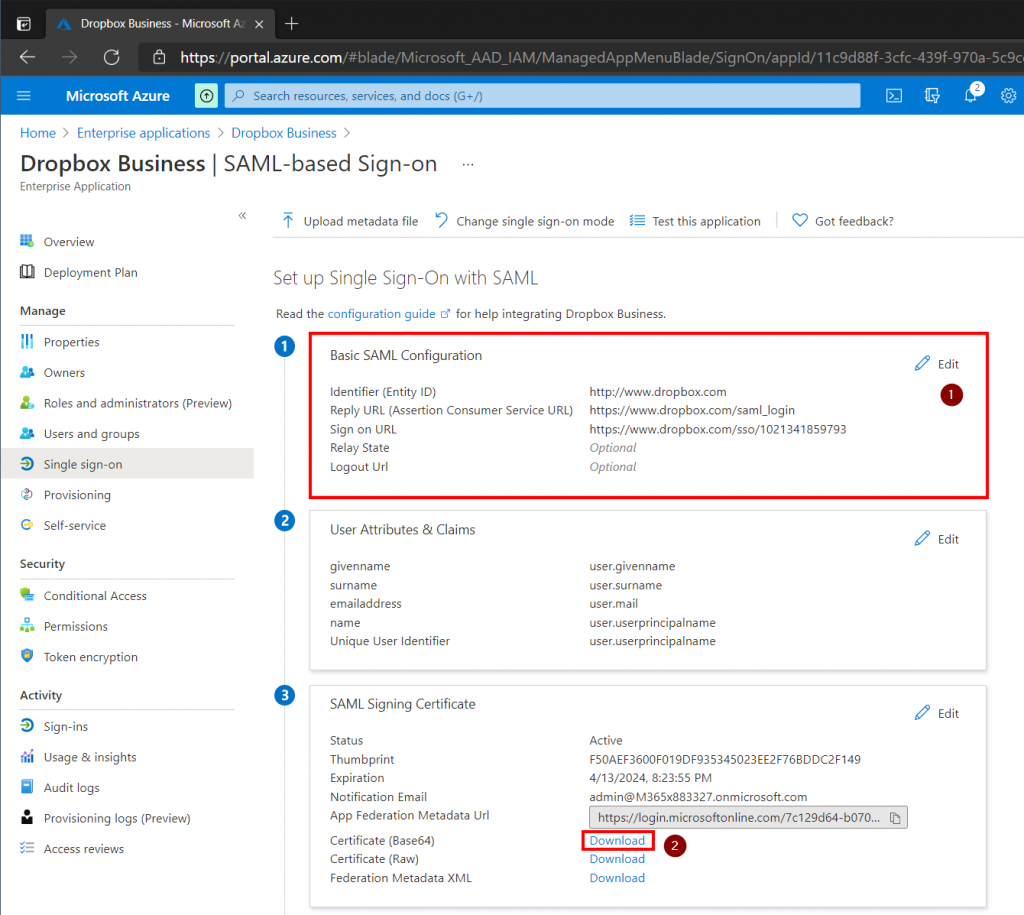
With this information gathered we can complete the first step which is our Basic SAML Configuration.
SAML Step 2
Next we need to review what attributes will be passed to our application during the Single Sign On (SSO) process. For Dropbox Business the defaults will work just fine, but other applications might expect or use other attributes.
SAML Step 3
Download the Base 64 Certificate and upload it in the Dropbox Business Admin Console.
SAML Step 4
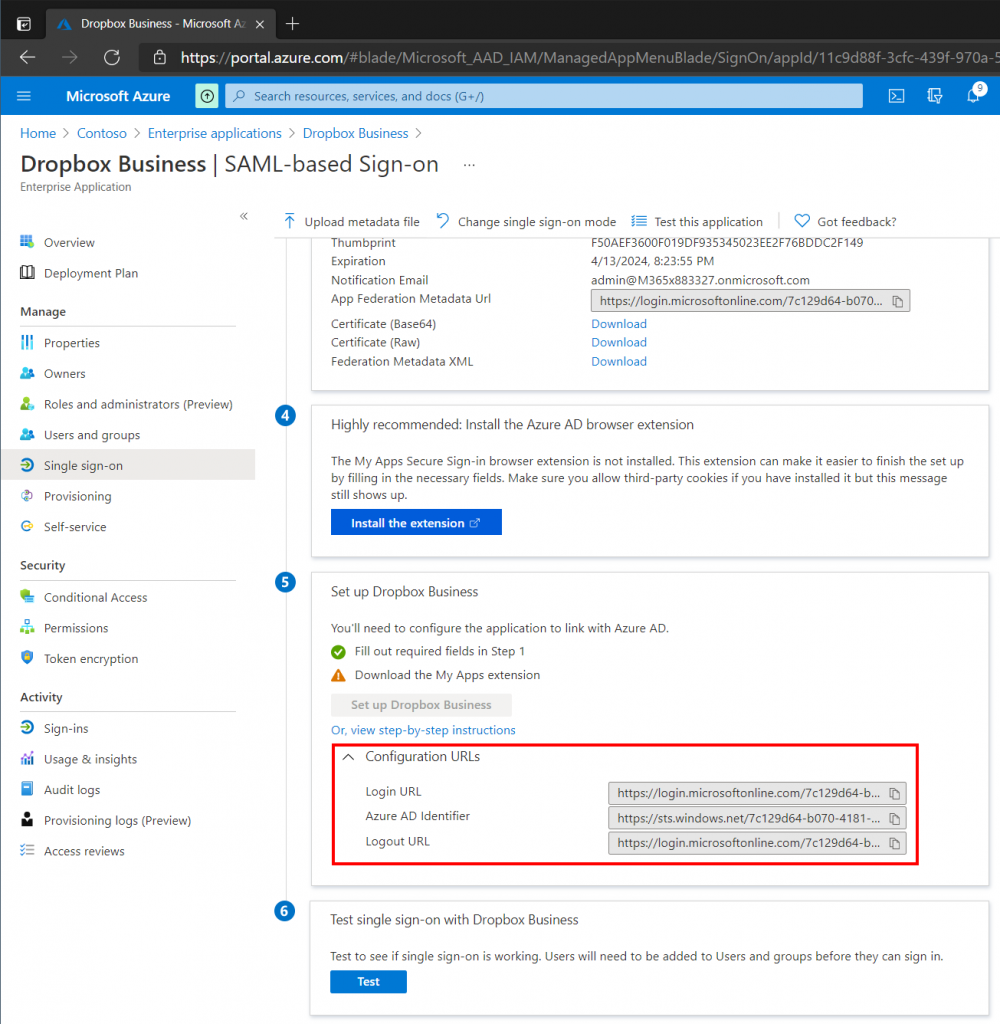
Microsoft recommend deploying the Azure AD Browser Extension to provide a much better user experience, however we will not be covering the extension in this post. Have a look the following documentation from Microsoft regarding the Browser Extension.
Plan Azure Active Directory My Apps configuration | Microsoft Docs
Locate & use apps on the My Apps portal – Azure AD | Microsoft Docs
SAML Step 5
In the Set Up Dropbox Business section expand the Configuration URLs. We need to copy the Login URL and Logout URL into the Dropbox Business Admin Console (see picture below).
At this point it is possible to test our Single Sign On setup. Make sure that your Azure Admin user is added to the application in the Users and Groups section of the application (or else the user wont have access). Obviously the account also needs to exist in Dropbox Business with the same username.
In the next step we will automate user provisioning so that administrators dont have to provision users in Dropbox Business manually.
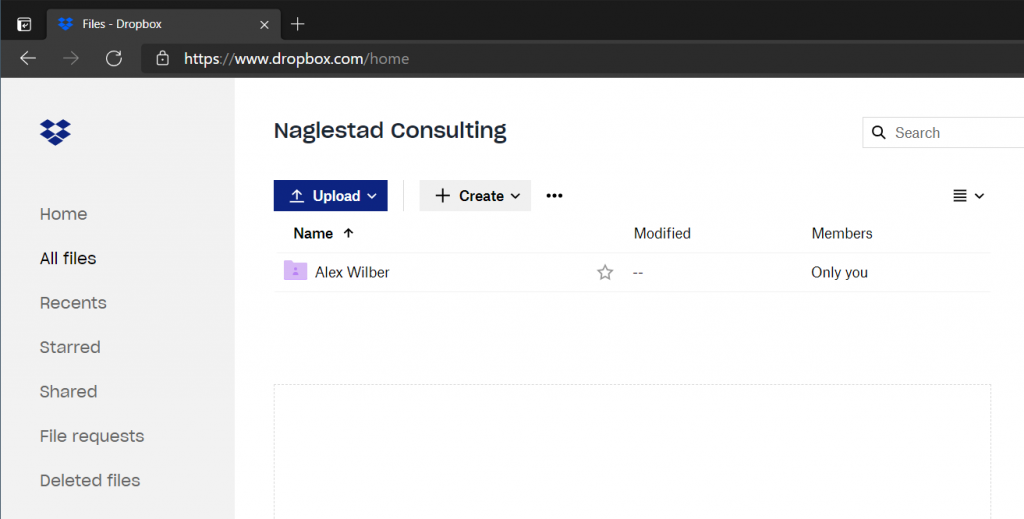
The picture below shows a fully configured Dropbox Business environment configured for Single Sign On (SSO).
Automatic Provisioning
Automatic Provisioning assists with user provisioning and deprovisioning in third-party applications so that Administrators dont have to do this manually. Given that all applications support Automatic Provisioning, a new employee simply needs to be created in an HR system which provisions the user in Azure AD. Based on permissions/groups given to the new employee the applicable third-party accounts needed by the users are created automatically.
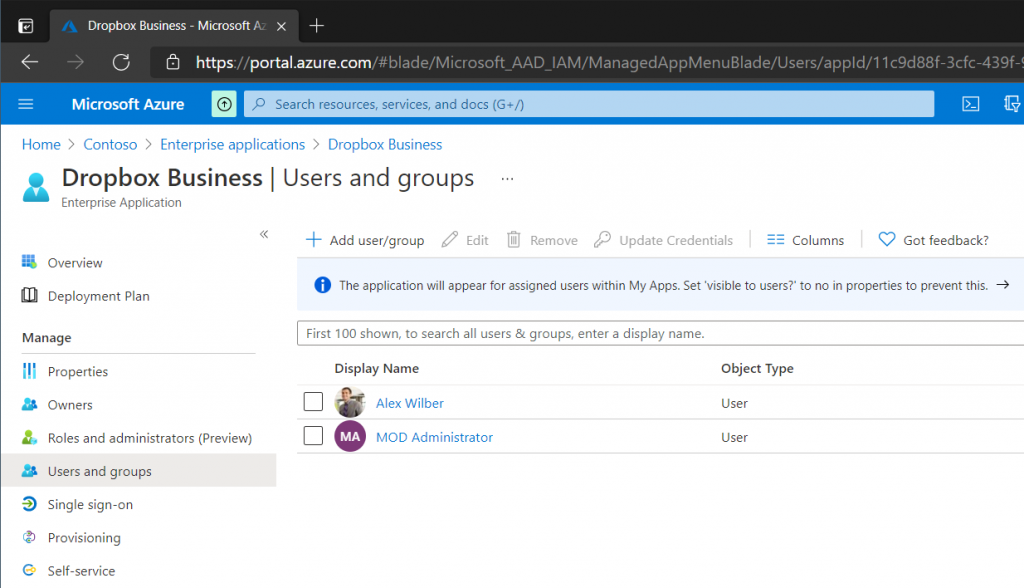
Open the Dropbox Business application under Enterprise Applications and select the User and Groups blade, add a single test user (make sure the user has a mailbox). When User Provisioning is confirmed working we can add additional users and groups.
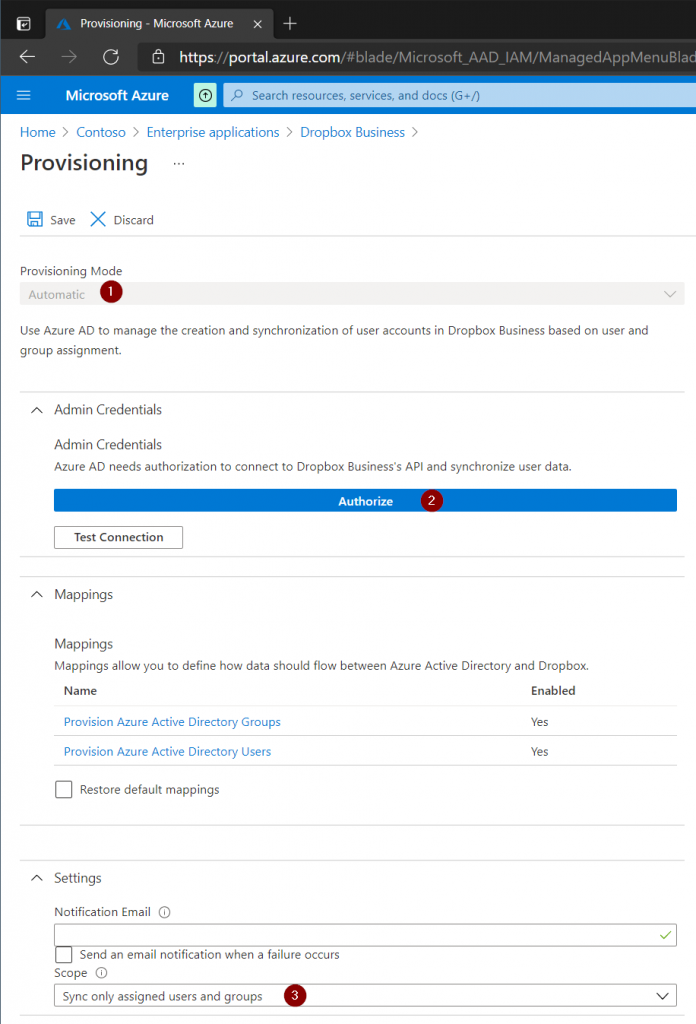
Open the Dropbox Business application under Enterprise Applications then select Provisioning. Press the Get Started box. In the Provisioning Configuration page set the Provisioning Mode to Automatic then authorize the connection to Dropbox Business with an administrator account. Finally set the Scope to only provision users that have access to the Dropbox Business application.
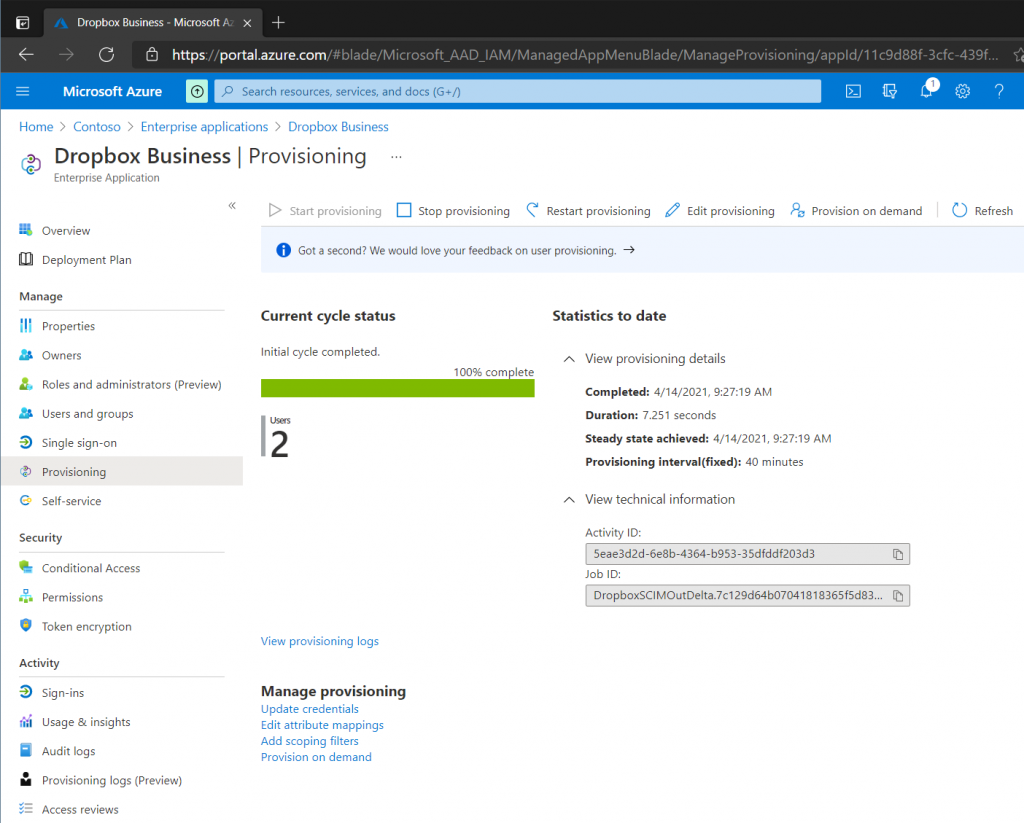
On the main Provisioning page click Start Provisioning. Azure AD will trigger the provisioning process periodically, typically every 40 minutes. However if there are many users added to the application, the initial provisioning could take anywhere from 20 minutes to several hours. In my case the provisioning process started after 10-15 minutes.
Once a user has been automatically provisioned an email from Dropbox is sent to the user. The user needs to click the link in the email and then activate their account. The user is then immediately logged into Dropbox Business through Single Sign On (SSO) and can start using their new account.
Note: Remove the test user from Users and Groups to test deprovisioning (removal) of Dropbox Business. The account will be removed on the next provisioning cycle. In the next section we will demonstrate how an end-user can request access to Dropbox Business, so make sure that the account has been deprovisioned unless you want to test with another user.
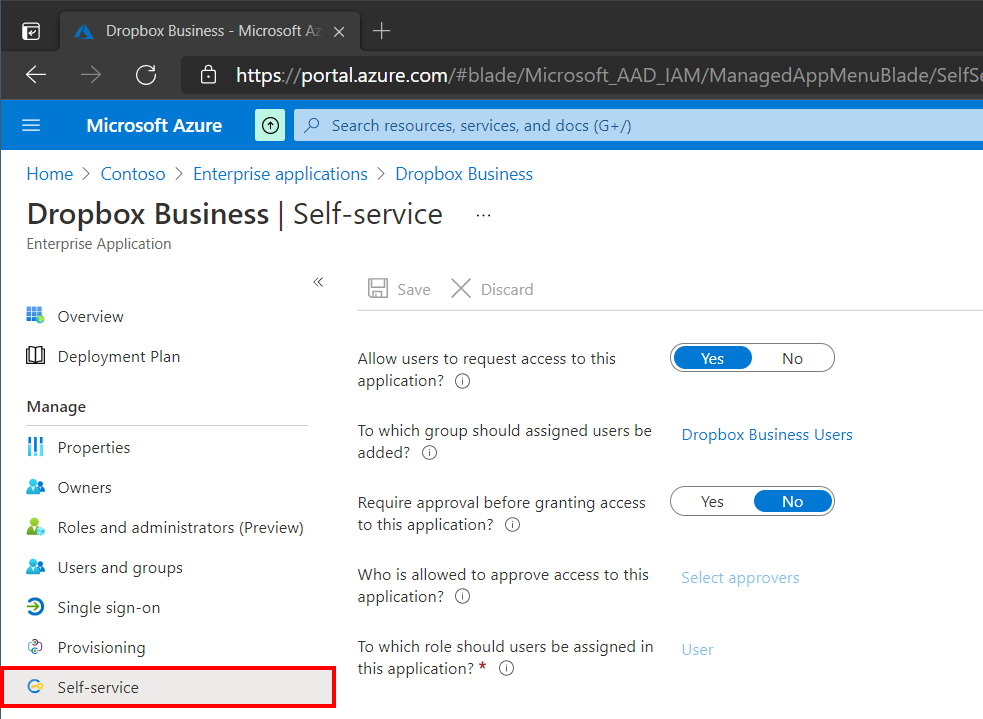
Self Service
Self Service is user friendly feature that allows end-users to request access to applications. In this example I have created a Security Group in Azure AD called Dropbox Business Users. Users who request the application will be added into this group when the request is approved by an administrator (if required). Since we want everyone in the Dropbox Business Users group to automatically be provisioned I have added it under the Users and Groups blade as well.
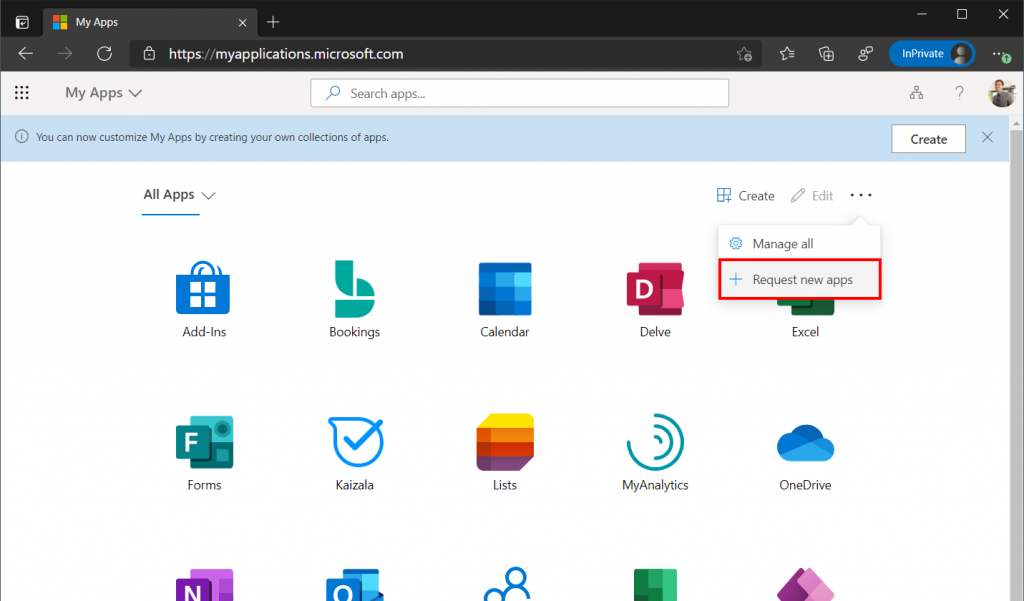
An end-user can navigate to My Apps to view all the applications a user has access to and request new ones. To request access to Dropbox Business, an end-user simply clicks the three dots in the top right menu and select Request New Apps.
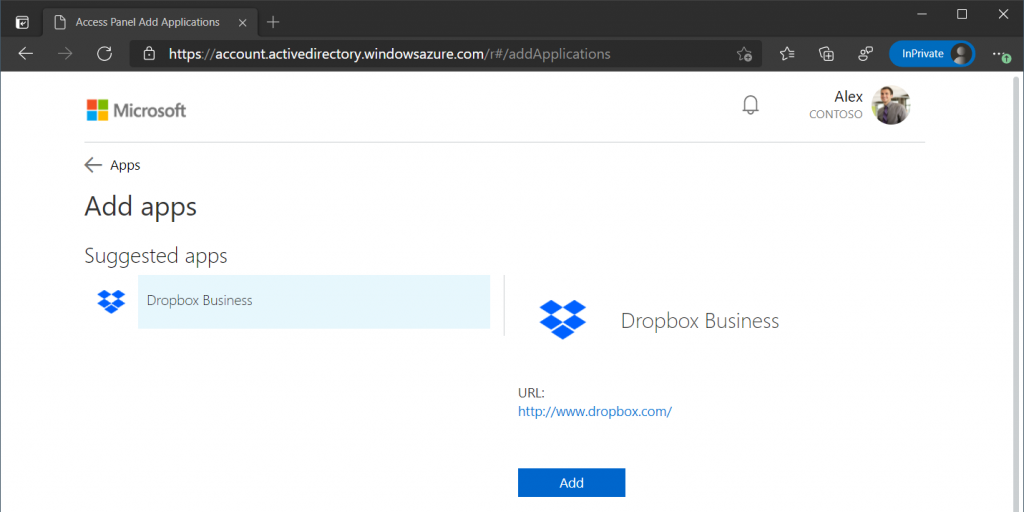
The user is then given a selection of available applications that can be requested. The user is then added to the Dropbox Business Users group (unless approval is required first). The users account in Dropbox Business will be automatically created on the next provisioning cycle.
Security
Now that we have configured Single Sign On (SSO) and Automatic Provisioning we can use the security products in Microsoft 365 like Conditional Access, Cloud App Security and more to add security policies. In this example we will use Conditional Access to require MFA before a user is allowed to access Dropbox Business. Read my post on Getting Started with Conditional Access if you are new to Conditional Access policies.
Note: To increase security for smaller organizations Microsoft has implemented Security Defaults that is enabled as default for all new tenants. Conditional Access will not be available as long as Security Defaults is enabled. Read more about Security Defaults in Microsoft’s documentation.
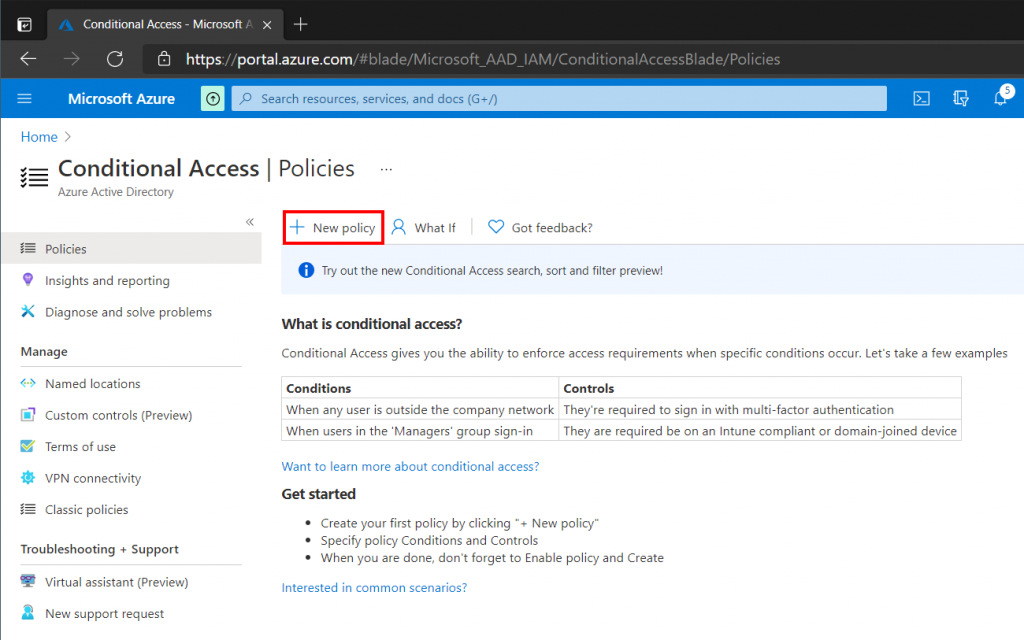
In the Azure Portal search for Conditional Access. Then select New Policy.
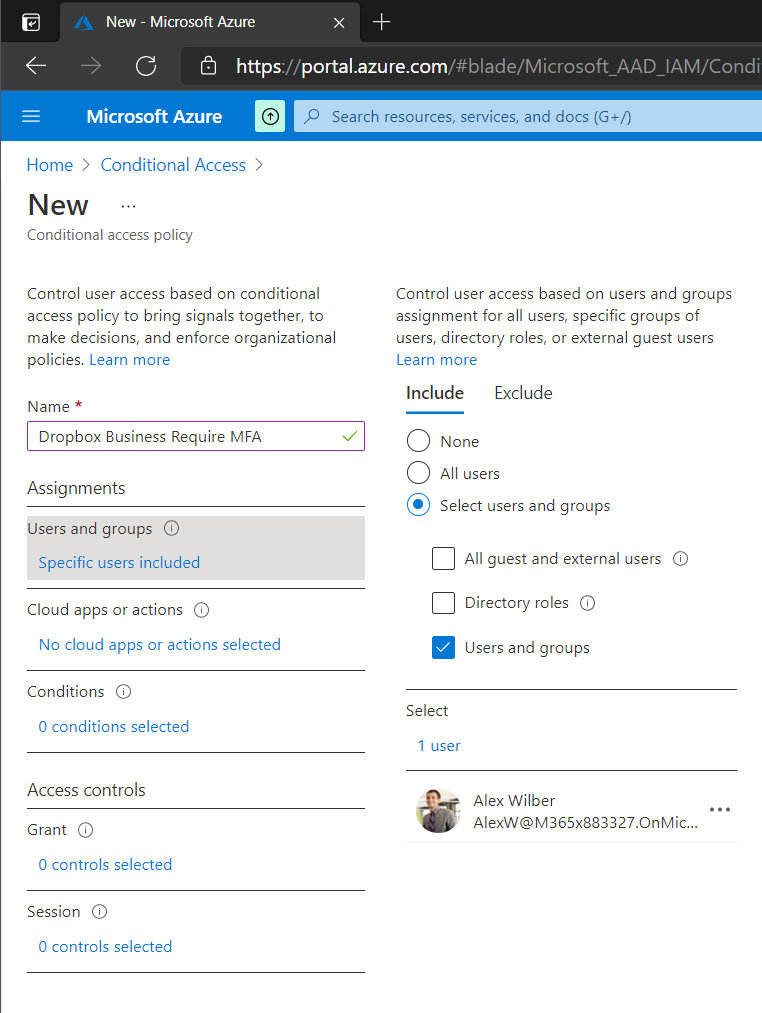
Give your policy a Name, then on the Users and Groups tab specify what users or groups should be included in the policy scope. I have chosen to add a single test user, but we could use the Dropbox Business Users security group that was created earlier.
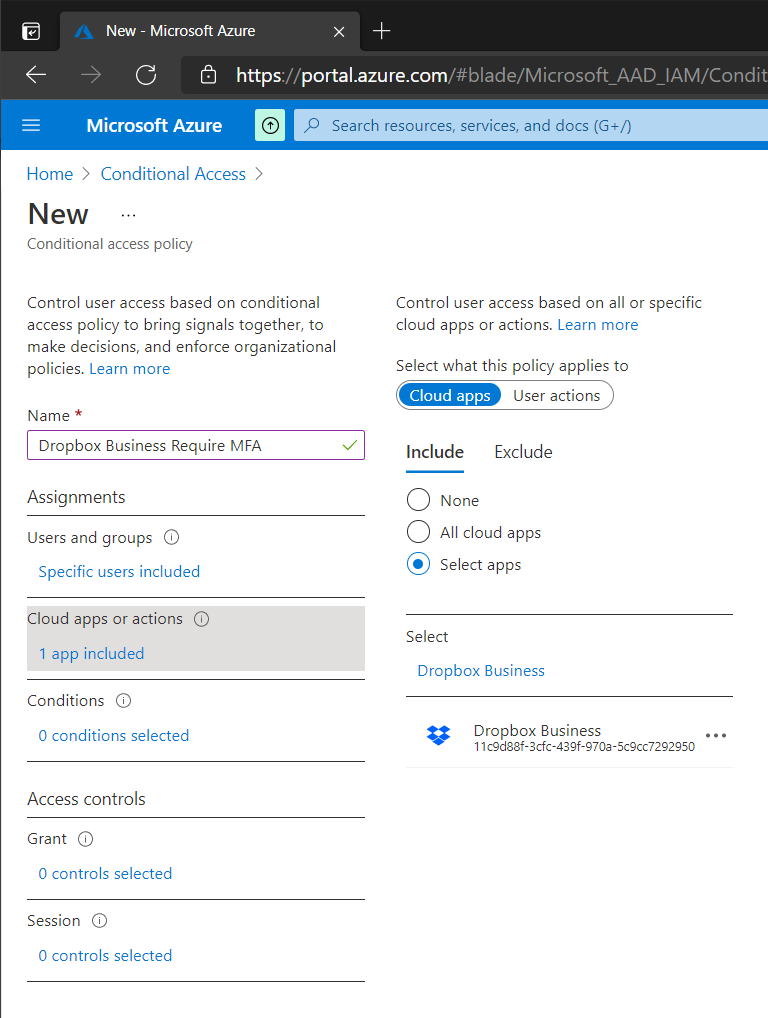
On the Cloud Apps or Actions tab select any applications that should be included in the policy. In this example case only Dropbox Business has been selected.
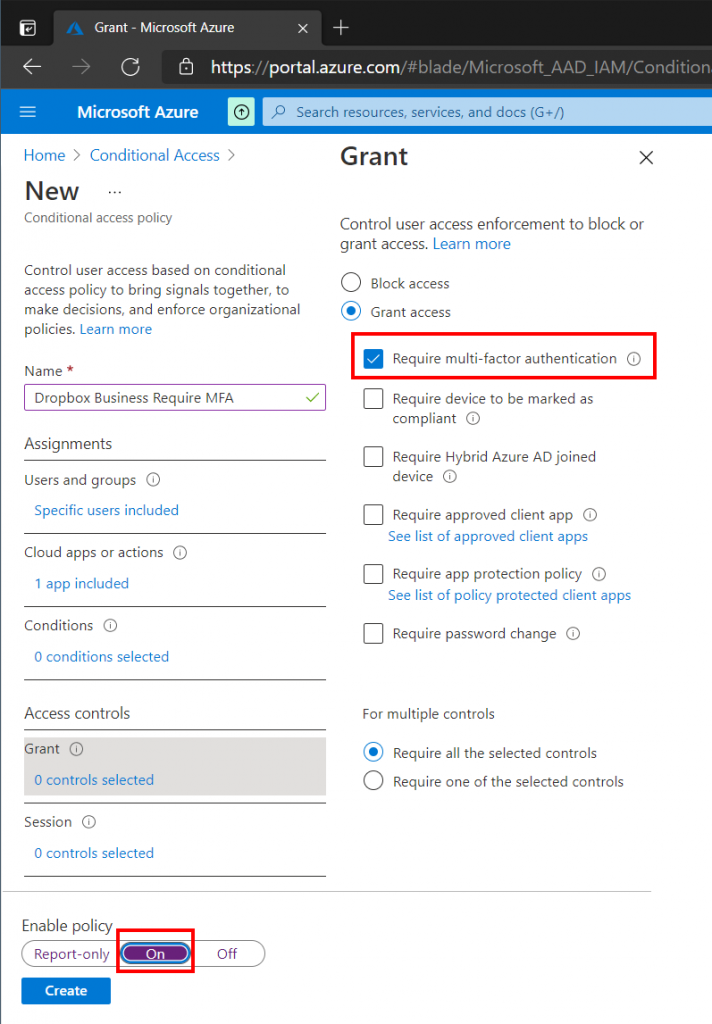
On the Grant page select Grant Access and make sure that Require Multi-Factor Authentication is selected. Set the policy to On at the bottom and click Create. Our selected users will now be prompted for Multi-Factor Authentication when accessing Dropbox Business.