
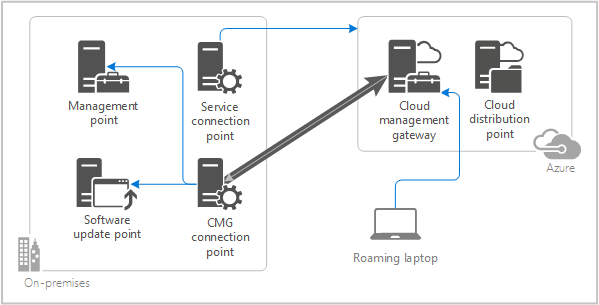
A Cloud Management Gateway (CMG) is a feature in Configuration Manager (Endpoint Manager) that allows organizations to manage and deliver content to their Configuration Manager clients without the need of VPN solutions. Organizations that have been using Configuration Manager for a while, might already have implemented or be familiar with IBCM (Internet Based Client Management) that allows for much of the same functionality, but uses an on-premise server exposed to the internet as an alternative to CMG. Both deployments are still valid but I always encourage new deployments to use a Cloud Management Gateway as there is nothing to maintain on-premise. In this post we will be walking through the steps in order to implement CMG and sharing some of my troubleshooting tips.
- Prerequisites
- Azure App Registration
- Creating the Cloud Management Gateway
- Cloud Management Gateway Connection Point
- Client Settings
- Branch Sites (Optional)
- Troubleshooting
Prerequisites
- Configuration Manager (latest version recommended)
- HTTPS/PKI connectivity in Configuration Manager (see this post)
- Public (Wildcard) Certificate (recommended)
- Azure Subscription
- Resource Provider: Microsoft.Storage
- Resource Provider: Microsoft.ClassicCompute
- Internal and Public DNS
1. Configuration Manager and HTTPS/PKI
Firstly, It is always recommended to use the latest version of Configuration Manager as this includes the newest functionality and bug fixes. At the time of writing the latest version is 2010 (2103 will be available soon) so make sure your patch level is up to date. Technically CMG is supported on earlier versions but the Configuration Manager team has made a lot of improvements recently.
Secondly it has been a best practice for years to use HTTPS-only for communication in Configuration Manager, so this needs to be in place (see my post on enabling HTTPS/PKI here. Yes, Enhanced HTTP does work but is out-of-scope for this post as using HTTPS is following Microsoft’s best practice rules.
2. Azure Subscription
The first thing we need is an Azure Subscription. In the Azure Portal search for Subscriptions to view the subscriptions in the tenant. A Global Administrator can add a new subscription to the tenant if needed.
You should not be too concerned about the running cost of a Cloud Management Gateway at least not if you look at the price per device. Microsoft MVP Johan Arwidmark shares some real-world costs for Cloud Management Gateway deployments in this blog post:
- Org with 300 devices using CMG, monthly cost about 100 USD. Cost per device: 0.33 USD
- Org with 500 devices using CMG, monthly cost about 105 USD. Cost per device: 0.21 USD
- Org with 700 devices using CMG, monthly cost about 100 USD. Cost per device: 0.14 USD
- Org with 2200 devices using CMG, monthly cost about 100 USD. Cost per device: 0.05 USD
- Org with 3500 devices using CMG, monthly cost about 140 USD. Cost per device: 0.04 USD
- Org with 9000 devices using CMG, monthly cost about 350 USD. Used to host 250 GB of applications, hourly policy refresh, and weekly HW/SW inventory. Cost per device: 0.04 USD
- Org with 75000 (75K) devices using CMG, monthly cost about 1600 USD. Details: 600 USD for instances, 100 USD for storage, and 900 USD for about 40 TB of data download. Cost per device: 0.02 USD
- Org with 100,000 (100K) devices using CMG, monthly cost about 3050 USD. Details: 500 USD for instances, 50 USD for storage, and 2500 USD for about 40 TB of data download. Cost per device: 0.03 USD
Note: Cloud Management Gateway uses the classic cloud service and this is not supported by subscriptions from Azure Cloud Service Providers (CSP). It is still possible to deploy Cloud Management Gateway with a virtual machine scale set (Configuration Manager 2010 or later required), however reference Microsoft’s documentation for this particular scenario.
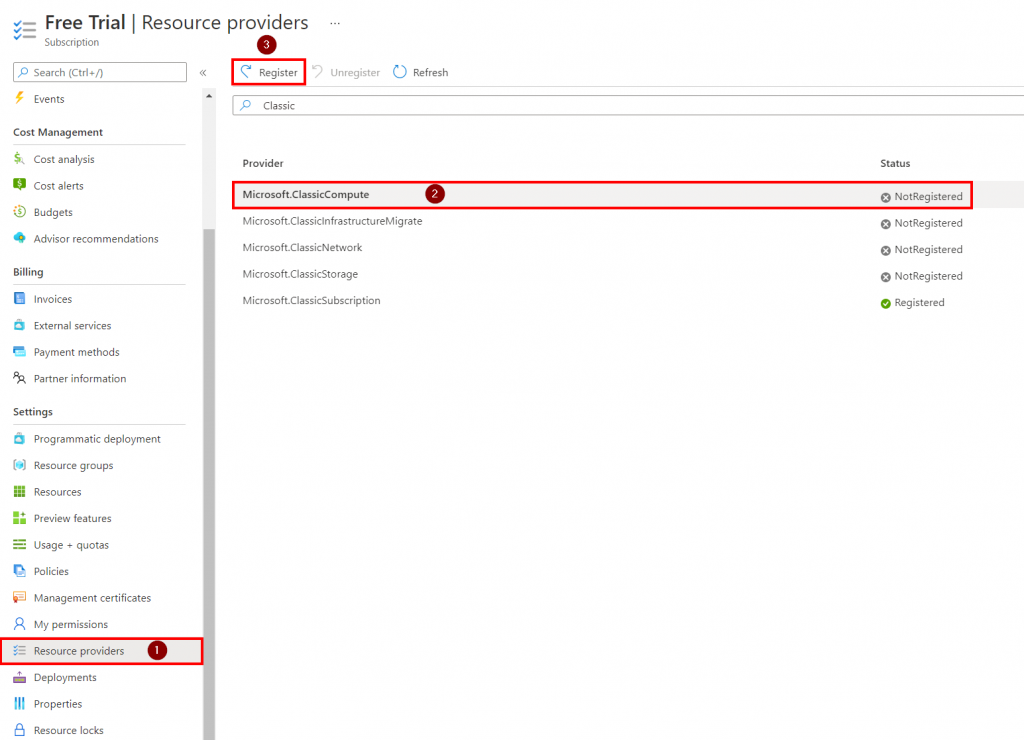
3. Verify Resource Providers
Once we have a subscription that can be used for our Cloud Management Gateway, we need to verify that we have registered the required Resource Providers. In the Azure Portal search for Subscriptions, then select the subscription that will used for the Cloud Management Gateway. Once selected scroll down to Resource Providers located under Settings. Search for Microsoft.ClassicCompute and register the resource provider if needed. Repeat the same process for Microsoft.ClassicStorage and Microsoft.Storage. Allow a few minutes for the Resource Providers to register.
The Resource Providers can also be registered through PowerShell by using the following method:
#Register the Classic Storage Resource Provider
Register-AzResourceProvider -ProviderNamespace Microsoft.ClassicStorage

#Verify Resource Provider Registration
Get-AzResourceProvider -ProviderNamespace Microsoft.ClassicStorage
4. Verify Deployment Name
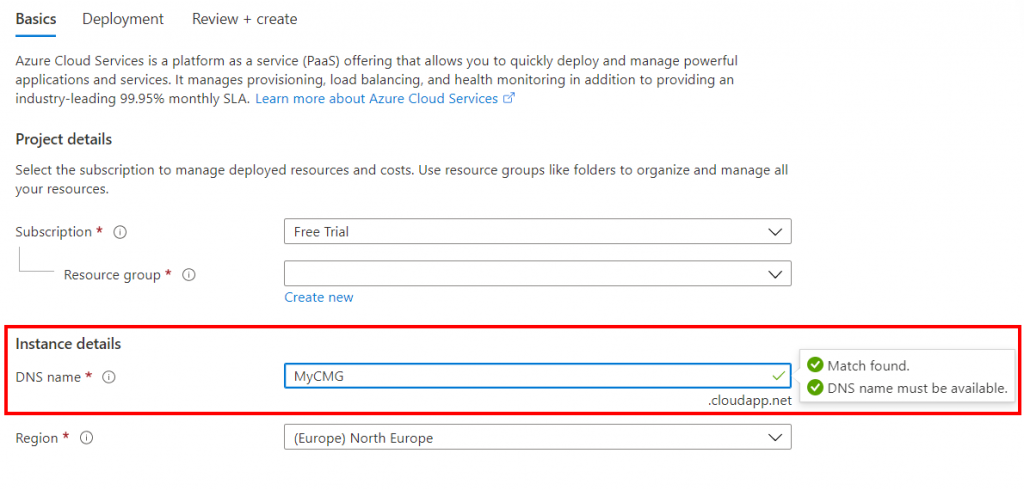
The Cloud Application Gateway needs to have a globally unique deployment name. To verify that the name you are planning to use is available open the Azure Portal then search for Cloud Services (classic) in the Azure search bar. On the Cloud Services (classic) page select Add then under Instance Details enter the DNS name for the Cloud Management Gateway. In this example we can see that the name MyCMG.cloudapp.net is available for use (note the two green checkmarks). The Cloud Management Gateway also needs to have a Classic Storage account so make sure that the same name is valid for the storage account as well.
Important: Do NOT complete the wizard. This is just for making sure our deployment name is available for use.
5. Verify DNS Records
Create the following DNS record on Public and Internal DNS Servers: deploymentname.domain.com -> deploymentname.cloudapp.net. The steps do do this will depend on the DNS provider for your domain.
– Record Type: CNAME
– Host: deploymentname.domain.com (example: MyCMG.domain.com)
– Target: deploymentname.cloudapp.net (example: MyCMG.cloudapp.net)
Important: It could take anywhere from a few minutes to 48 hours before DNS updates have been propagated.
Azure App Registration
The first step is to make sure that Configuration Manager can communicate with Azure. If there already is a Cloud Management connection defined in Configuration Manager these steps can be skipped.
In the Administration workspace select Azure Services under Cloud Services. In the top Ribbon select Configure Azure Services. In the wizard that appears select Cloud Management and press Next.
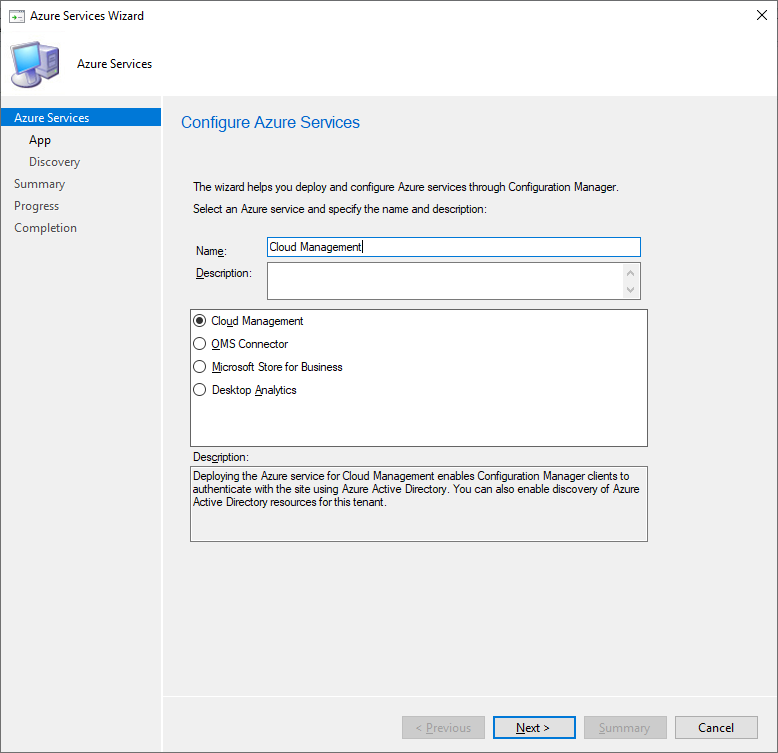
On the App page make sure that AzurePublicCloud is set as the Azure Environment, then click Browse.
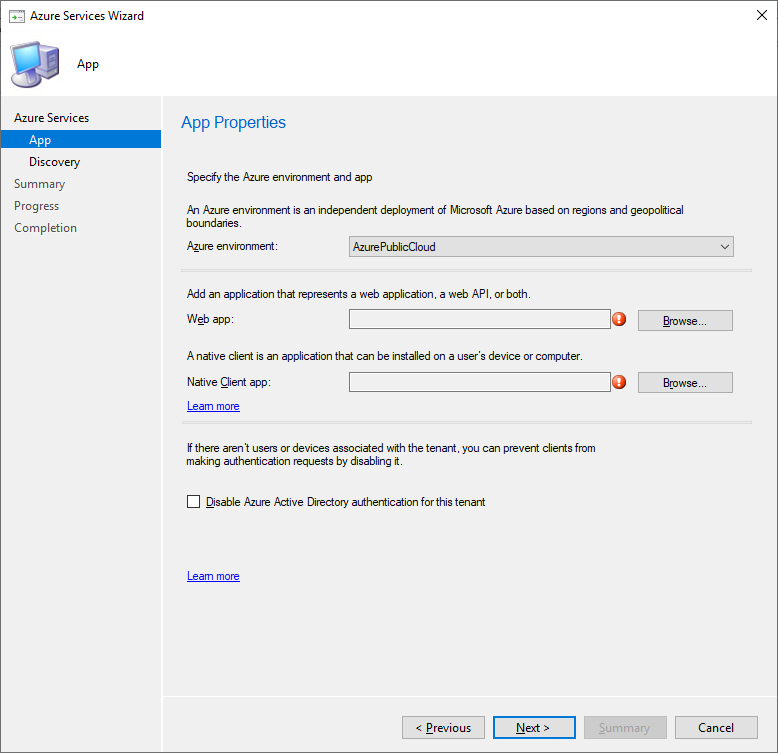
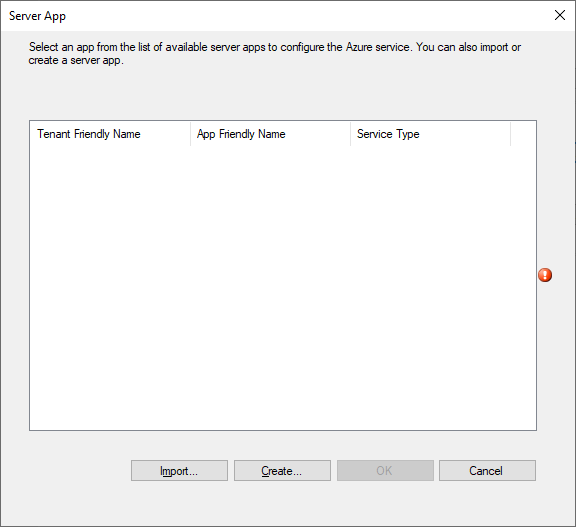
Click Create to create a new Azure AD Application for Configuration Manager.
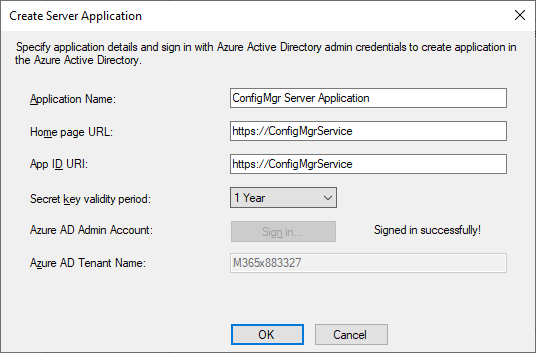
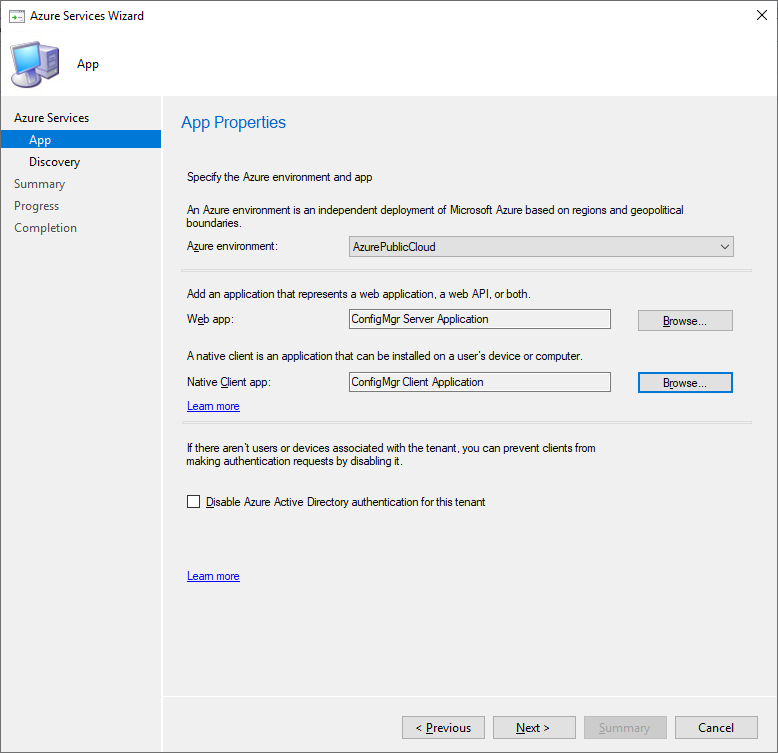
For the Application Name we will simply use ConfigMgr Server Application but you may call it whatever you like. For Home Page URL and App ID URL keep the defaults. Press the Sign In button and then press OK.
Repeat the process for the ConfigMgr Client Application.
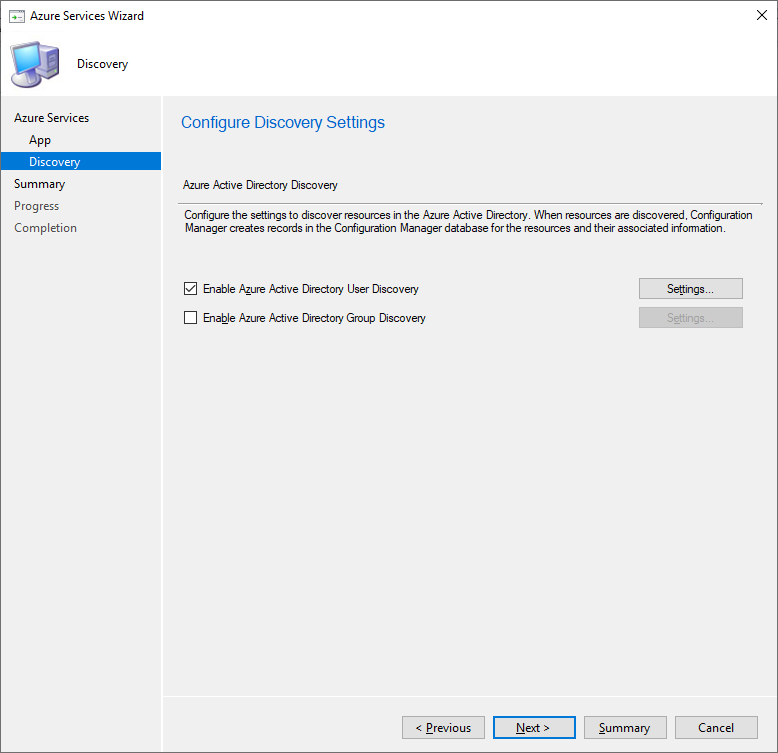
On the Discovery page select if Configuration Manager should discover Users or Groups in the cloud (Azure Active Directory).
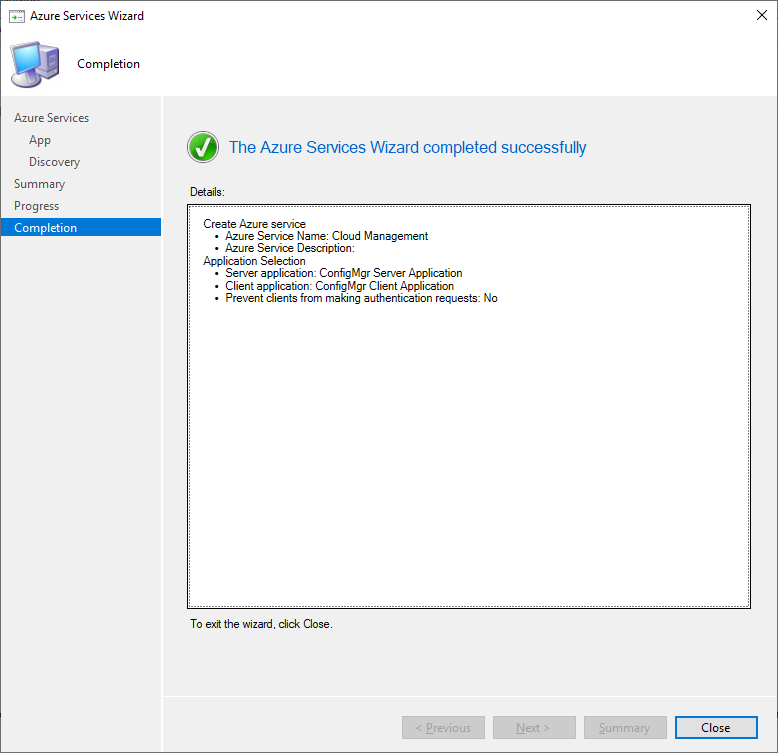
Complete the wizard.
Creating the Cloud Management Gateway
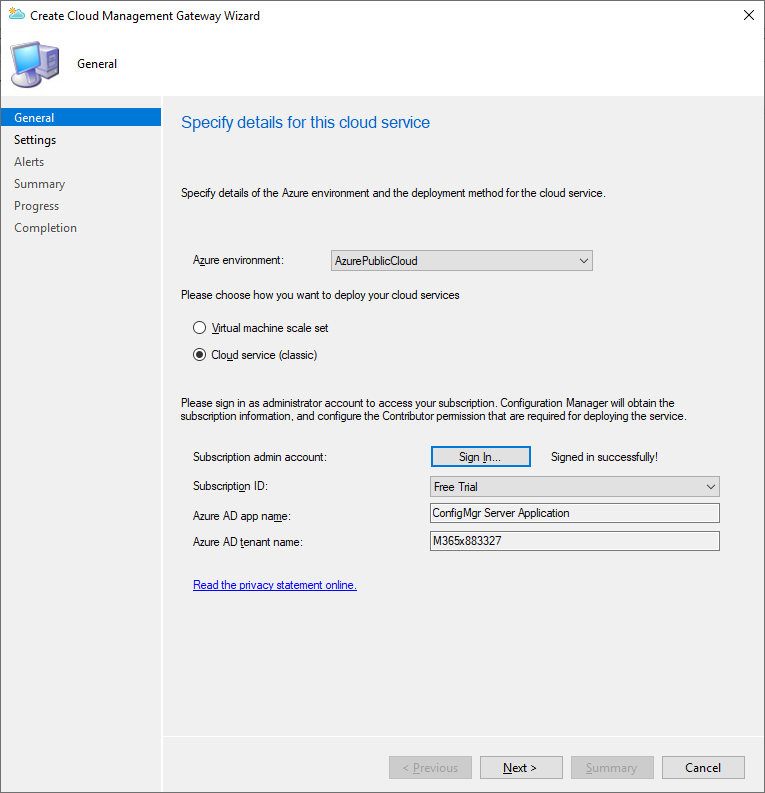
In the Administration workspace select Cloud Management Gateway under Cloud Services. In the top Ribbon select Create Cloud Management Gateway. In the wizard that appears make sure that Cloud Service (Classic) is selected then Sign-in to Azure.
On the Settings page specify a certificate that matches the domain we are using. A wildcard certificate is great for production usage, but it is also possible to use a certificate from your internal PKI (not covered in this post).
Certificate File: Path to a password protected certificate file
Service Name: Use the deployment name that we verified earlier and append your domain name. Make sure that the chosen certificate is valid for this name.
Deployment Name: Enter the deployment name that we verified earlier
Resource Groups – Create a new Resource Group is recommended
Region: Pick the region where the CMG should be deployed
VM Instance: How many CMG instances do you need. Start with a single instance.
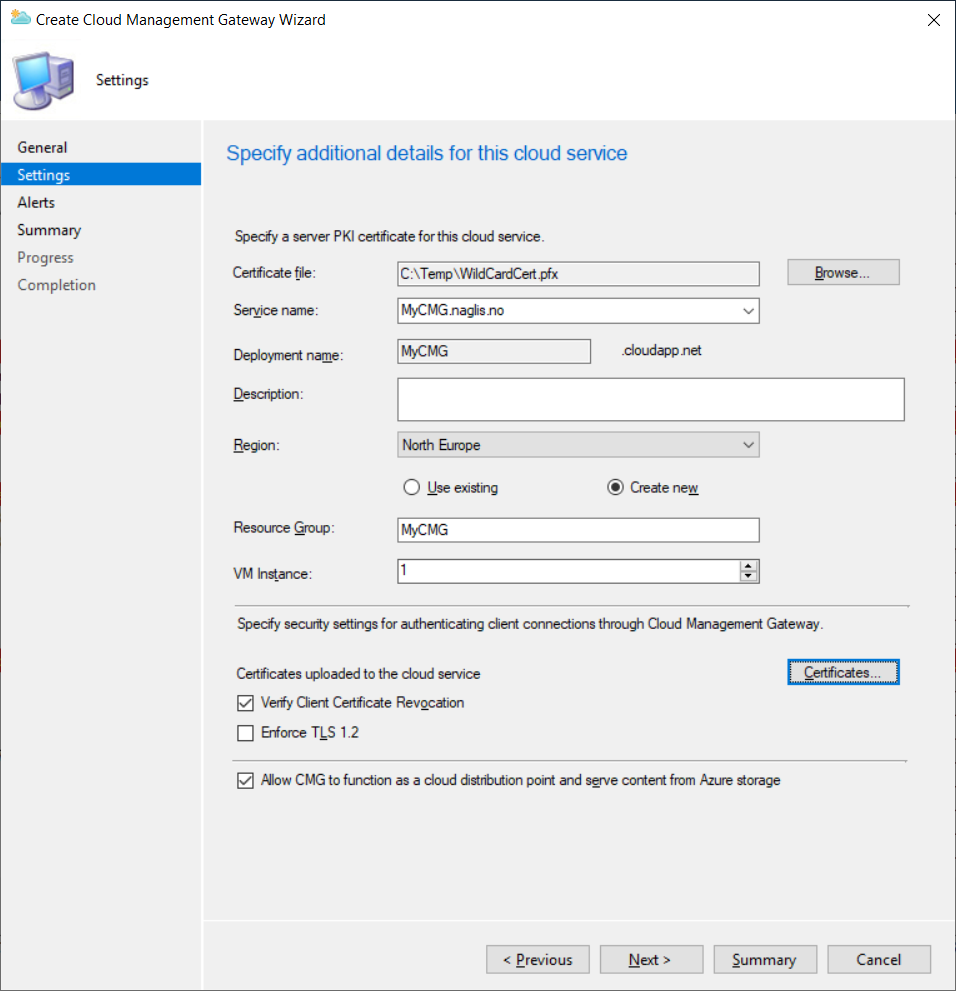
Press Certificates and specify any Root and Intermediate certificates that should be trusted.

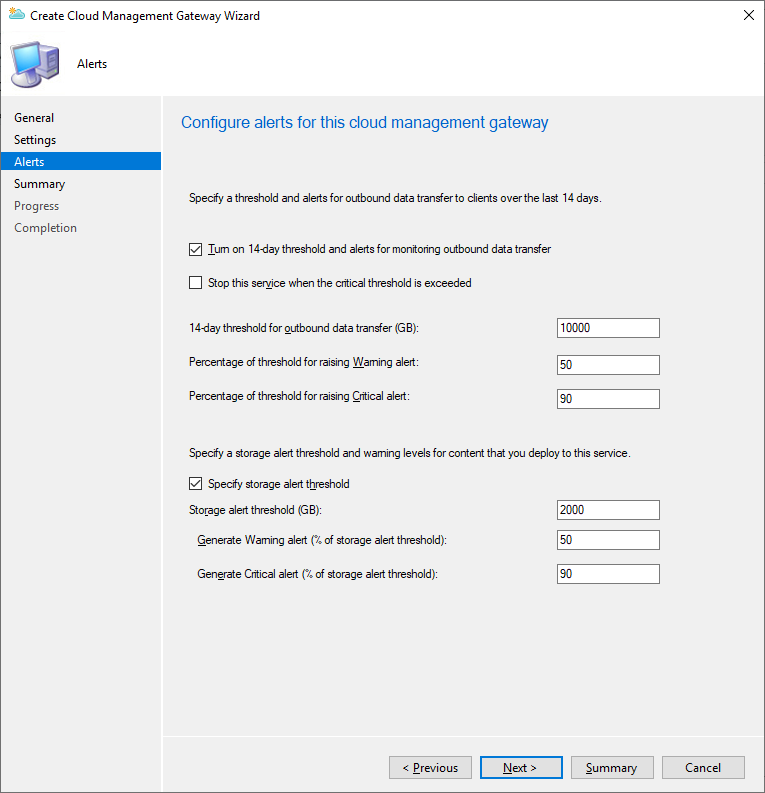
Configure the Alerts and Thresholds to your needs. I also recommend creating a Budget / Alerts on the Azure Subscription used to deploy the Cloud Management Gateway. This allows alerting if consumption goes above a specific point.
Once the wizard has been completed it will take around 25-35 minutes for the Cloud Management Gateway deployment in Azure to complete. Monitor CloudMgr.log for any errors. If you encounter any issues have a look at the Troubleshooting section at the end of this post.
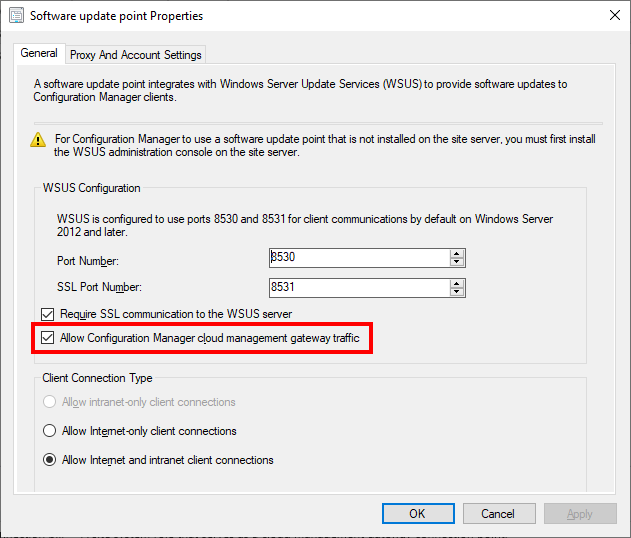
While we wait for the deployment we need to verify that the Cloud Management Gateway can communicate with at least one Management Point.
In the Administration workspace select Servers and Site System Roles under Site Configuration. Locate the server that has the Management Point Role and view its properties. Make sure that the Allow Configuration Manager Cloud Management Gateway Traffic checkbox has been selected.
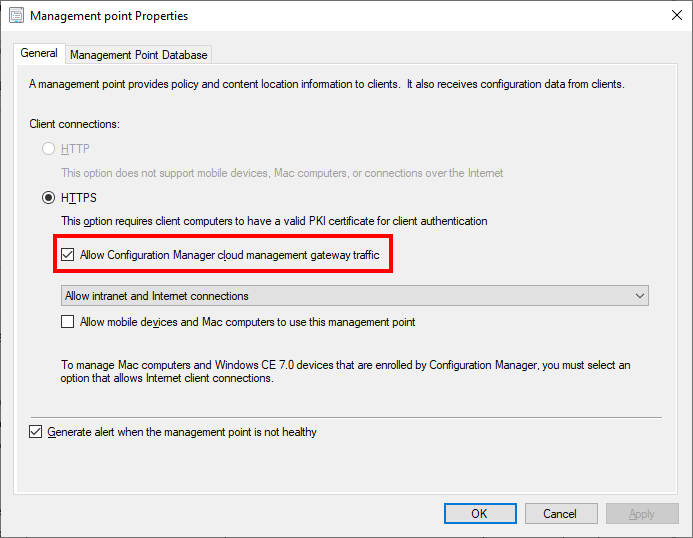
If you want the Cloud Management Gateway to communicate with a Software Update Point the checkbox needs to be ticked on that role too.
Cloud Management Gateway Connection Point
In the Administration workspace select Servers and Site System Roles under Site Configuration. Select your primary site (or the server that should handle communication with the CMG) then click Add Site System Roles on the in the top Ribbon. These steps can be completed while the CMG is provisioning,
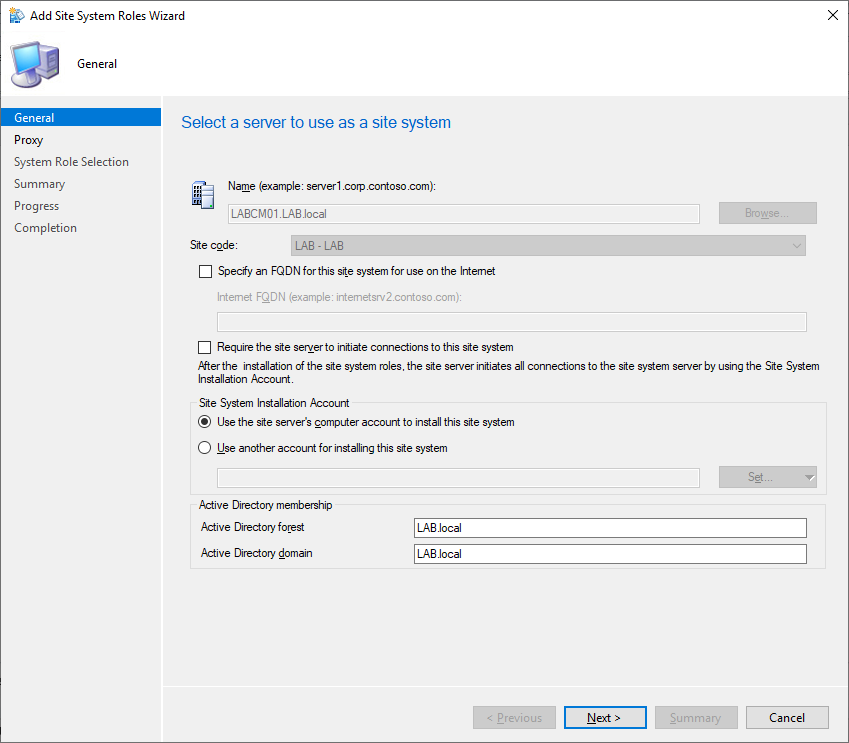
On the System Role Selection page select Cloud Management Gateway Connection Point
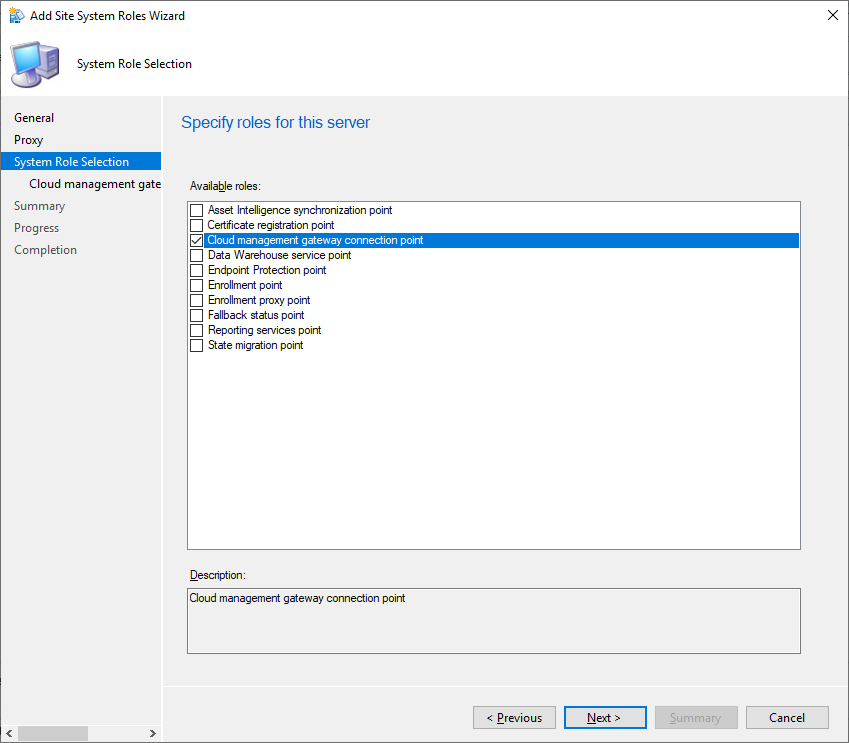
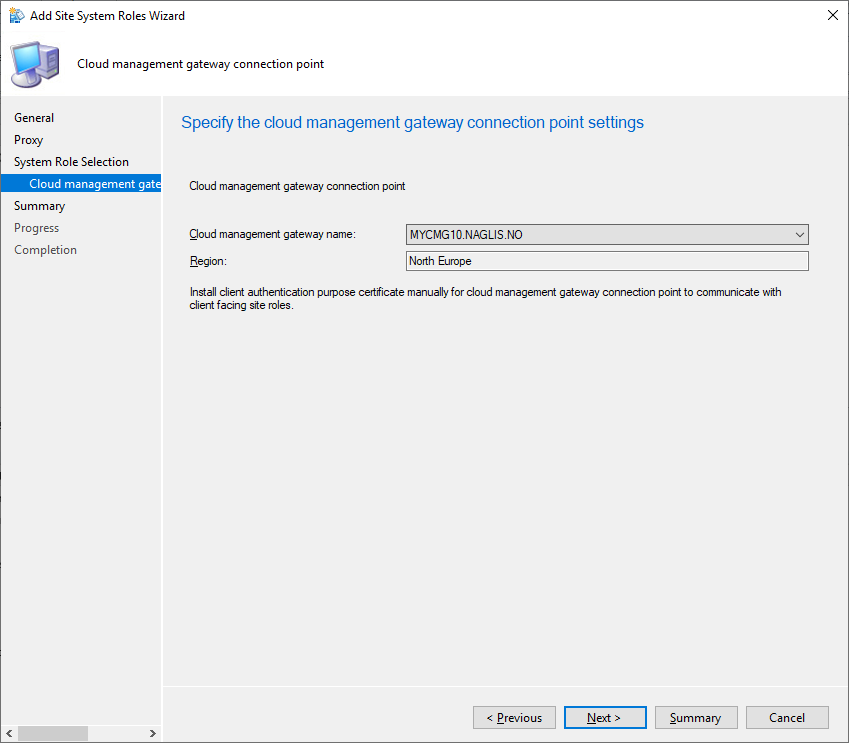
Choose the Cloud Management Gateway Name from the dropdown list and complete the wizard. Allow a few minutes for the installation to complete. Communication with the Cloud Management Gateway can be viewed in the SMS_CLOUD_PROXYCONNECTOR.log file.
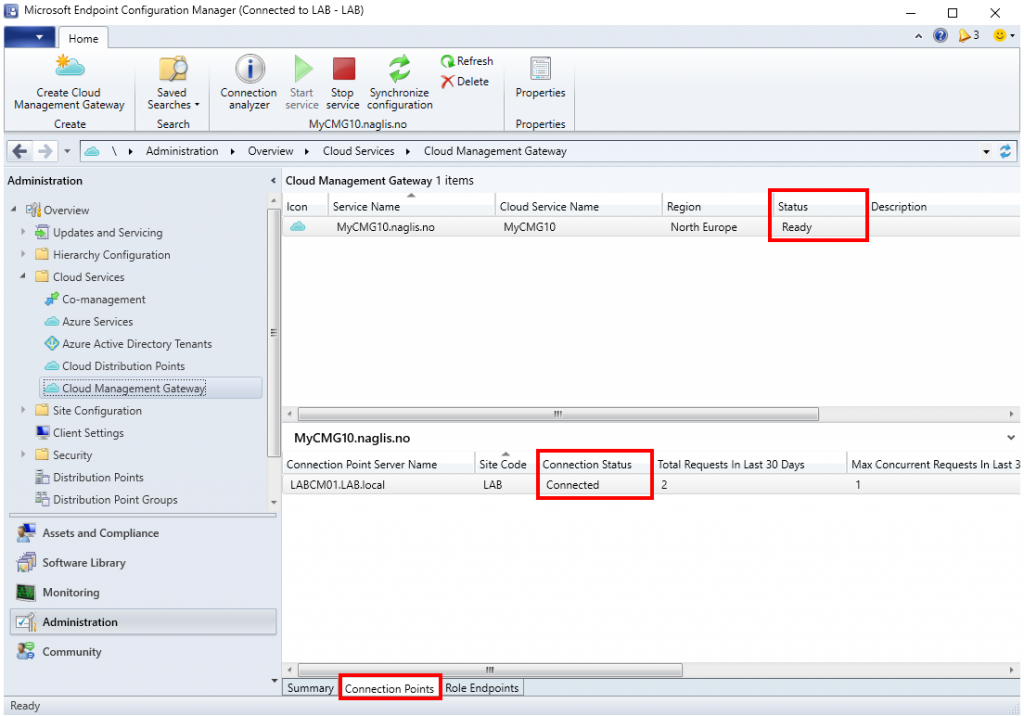
When the Cloud Management Gateway (CMG) has been provisioned the status should say Ready. Select the CMG Instance and select Connection Points at the bottom. Verify that the Connection Status is Connected. If the status is showing Disconnected verify that the Cloud Management Gateway deployed correctly, DNS records have been updated both internally and externally and that the Connection Point has had adequate time to install.
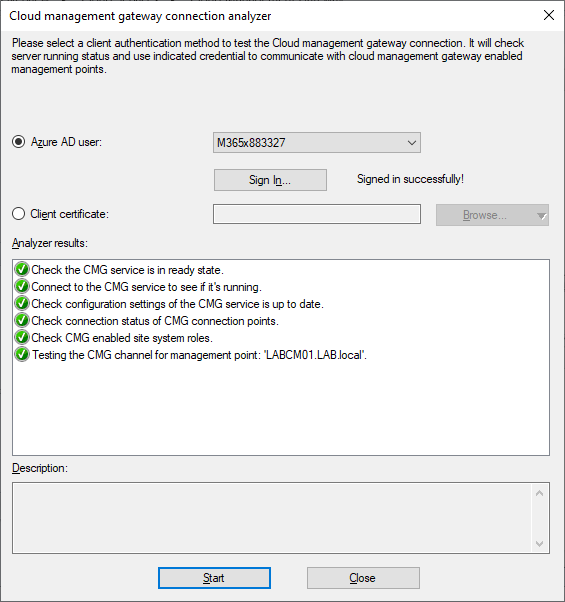
To verify connectivity to our Cloud Management Gateway select Connection Analyzer from the top Ribbon. Sign in using your credentials and press the Start button. If everything was done correctly all the checkmarks should be green. If there are any issues firstly try the Synchronize Configuration button and review any connectivity issues in the SMS_CLOUD_PROXYCONNECTOR and CLoudMgr.log files. For further troubleshooting have a look at Ronny de Jong’s post on using the Connection Analyzer here.
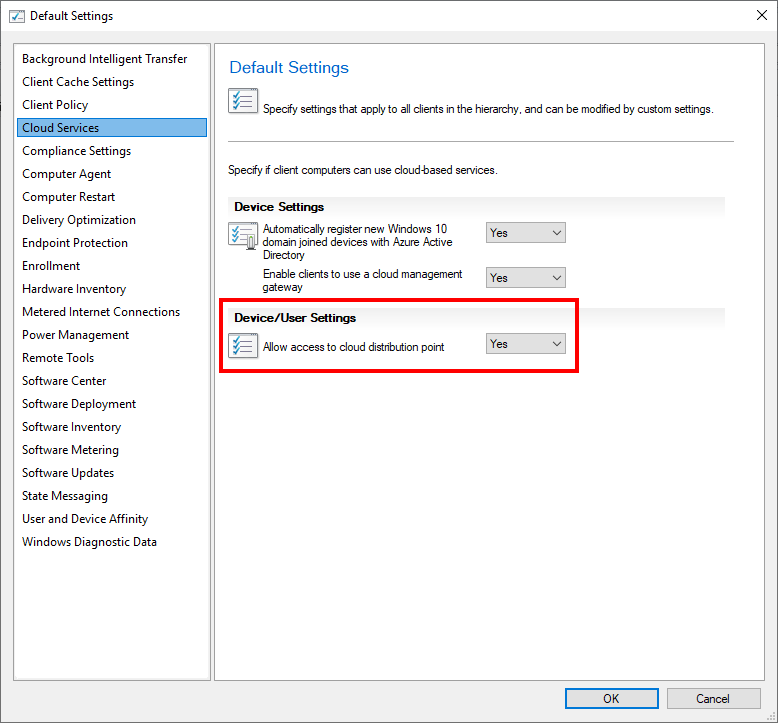
Client Settings
In the Administration workspace select Client Settings. Select your client policy and enable access to the Clod Management Gateway in the Cloud Services section. Make sure that your client policy is deployed to a Device Collection and not a User Collection.
When clients are able to connect to a domain controller or an on-premise Management Point the client is considered on the Internal network and will use the site system for that particular boundary group. However if the client is unable to connect to a management point or domain controller the Configuration Manager will connect through the CMG.
Note: Clients need to be on the internal network to learn the location of the Cloud Management Gateway (CMG), unless Azure AD is used for Authentication as defined here. The location of the CMG is automatically provided to the client on the next Location Request which is run every 24 hours by default. Restart the Configuration Manager service (SMS Agent Host) on the client to force a location request.
To verify that the Client has received the location of the Cloud Management Gateway run the following PowerShell command:
Get-WmiObject -Namespace Root\Ccm\LocationServices -Class SMS_ActiveMPCandidate | Where-Object {$_.Type -eq "Internet"}
Branch Sites (Optional)
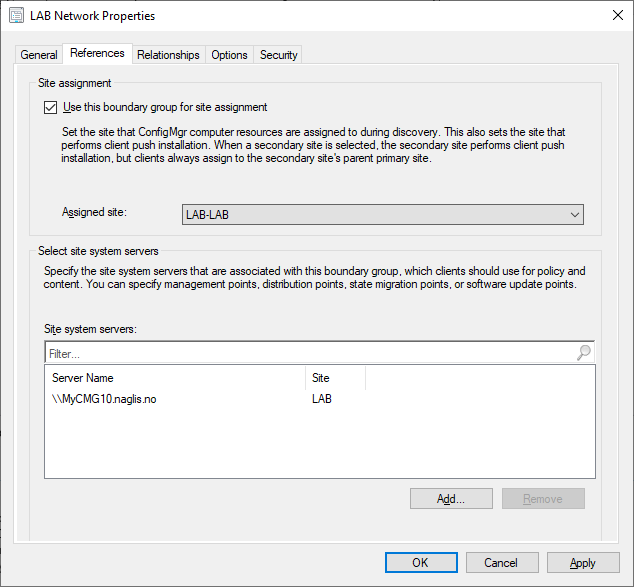
For smaller branch sites that do not have local servers and uses a site-to-site VPN to the main office, consider using the Cloud Management Gateway as the site server for these locations. This way content can be delivered through the local internet breakout point instead of sending traffic through the VPN.
In the Administration workspace select Boundary Groups under Hierarchy Configuration. Select the appropriate Boundary Group for the branch site and choose Properties. On the References tab set the Cloud Management Gateway as the site server.
Alternatively it is also possible to force clients to use the Cloud Management Gateway by configuring the registry setting below. This allows administrators to test Cloud Management Gateway configuration or
Note: Using this registry setting will cause the client to use the Cloud Management Gateway regardless if it is within a boundary group set to another system.
Set-ItemProperty -Path HKLM:\SOFTWARE\Microsoft\CCM\Security -Name ClientAlwaysOnInternet -Value 1
Troubleshooting
Here are a few issues that I have encountered when deploying Cloud Management Gateways.
- The subscription is not registered to use namespace Microsoft.ClassicCompute
This means that the subscription does not have access to the Microsoft Classis Compute Resource Provider. Follow the steps in the prerequisites section to resolve this issue.
- ERROR: Exception occured for service XXXXX : Hyak.Common.CloudException: AuthorizationFailed: The client ‘xxxxxxxx-xxxx-xxxx-xxxx-xxxxxxxxxxxx’ with object id ‘xxxxxxxx-xxxx-xxxx-xxxx-xxxxxxxxxxxx’ does not have authorization to perform action ‘Microsoft.ClassicCompute/domainNames/slots/read’ over scope ‘/subscriptions/xxxxxxxx-xxxx-xxxx-xxxx-xxxxxxxxxxxx/resourcegroups/XXXXX/providers/Microsoft.ClassicCompute/domainNames/XXXXXX/slots/Production’ or the scope is invalid. If access was recently granted, please refresh your credentials.
This error is usually encountered when the subscription used to deploy the Cloud Management Gateway does not have access to the Microsoft.ClassicStorage, Microsoft.ClassicCompute and Microsoft.Storage Resource Providers. View the steps in the prerequisites section or issue the following PowerShell command:
Register-AzResourceProvider -ProviderNamespace Microsoft.ClassicStorage.
Then to verify that the Resource Provider is Registered issue the following PowerShell command:
Get-AzResourceProvider -ProviderNamespace Microsoft.ClassicStorage
If the error persists try removing the ConfigMgr Server and Client Apps from Configuration Manager and Azure AD and then defining them again. The Applications can be removed from the App Registrations blade in Azure AD.
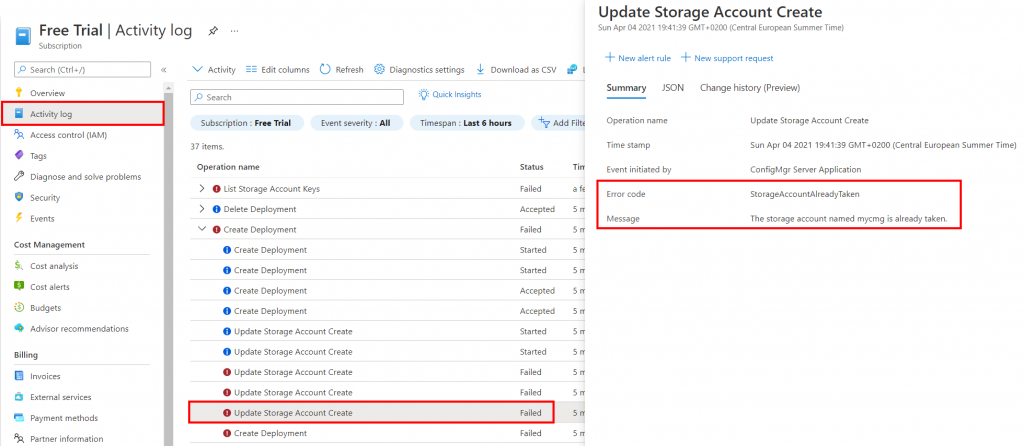
- ERROR: Resource Manager – Failed to finish deployment. Check [Monitor/Activity log] on Azure Portal for more information.
This is a generic issue, but the root cause can often be found by looking in the Activity Log for the specific subscription used to deploy the Cloud Management Gateway. In this case the deployment name for the storage account has already been taken by someone else. Make sure that the deployment name is unique and re-try the deployment. In the Azure Portal open Subscriptions then select the subscription that was used to deploy the CMG. Locate the Activity Log then review any errors.
- ERROR: Exception occured for service XXXXX : Microsoft.WindowsAzure.Storage.StorageException: The remote server returned an error: (403) Forbidden. —> System.Net.WebException: The remote server returned an error: (403) Forbidden.
I have only encountered this issue when the system time was incorrect. Make sure that the date and time is correct on the Configuration Manager server. I have heard that others have experienced issues even if the offset was only a few seconds. The Configuration Manager server should be synchronizing with a Domain Controller that should be configured against an external time source such as NTP.

