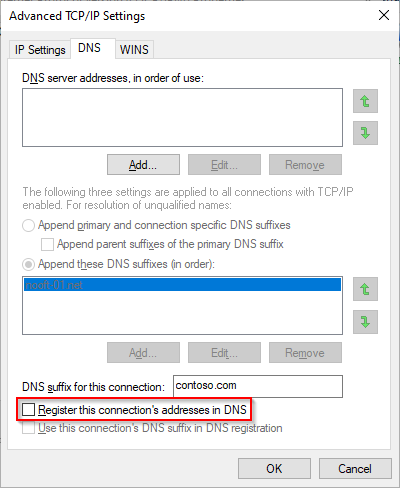
I recently configured an Always On VPN solution for a customer and we discovered that none of our Windows 10 clients were being registered correctly in DNS. This was a big issue for the customer because they had an application that used roaming licenses, and the licensing server required to be in contact with the end-user device before it could release a license (yes normally its the client that talks to the licensing server and not vice-versa).
The Always On VPN profile was configured using Microsoft’s documentation and their PowerShell template to build the Always On VPN profile script. For some reason the “Register this connection’s addresses in DNS” checkbox was never set on the on the VPN profile. The reason? Microsoft does not include the RegisterDNS option in their default profile, so naturally adding the option to the VPN profile should fix the issue right? but no.

We attempted to put the RegisterDNS option at a variety of places within the profile configuration, but again no success. A colalauge of mine suggested removing the entire DomainNameInformation section of the configuration, as the Always On VPN client will get its DNS servers from the VPN server anyway (might not be sufficient in all cases). Once the DomainNameInformation section was removed from the configuration the “Register this connection’s addresses in DNS” became checked. Success! or so we thought.
For reference here is how the VPN Profile configuration looked like before we removed the DomainNameInformation section.
$ProfileName = 'Contoso Always On VPN'
$ProfileNameEscaped = $ProfileName -replace ' ', '%20'

$ProfileXML = '<VPNProfile>
  <DnsSuffix>contoso.local</DnsSuffix>
  <NativeProfile>
<Servers>vpn.contoso.com</Servers>
<NativeProtocolType>Automatic</NativeProtocolType>
<Authentication>
  <UserMethod>Eap</UserMethod>
  <Eap>
   <Configuration>
               <EAP CONFIGURATION REMOVED>
   </Configuration>
  </Eap>
</Authentication>
<RoutingPolicyType>SplitTunnel</RoutingPolicyType>
  </NativeProfile>
<RegisterDNS>true</RegisterDNS>
<AlwaysOn>true</AlwaysOn>
<RememberCredentials>true</RememberCredentials>
<TrustedNetworkDetection>contoso.local</TrustedNetworkDetection>
  <DomainNameInformation>
<DomainName>.contoso.local</DomainName>
<DnsServers>192.168.3.20, 192.168.3.21</DnsServers>
</DomainNameInformation>
<RegisterDNS>true</RegisterDNS>
</VPNProfile>'
With all our configuration reviewed we were out of ideas and turned to Google. There are lots of articles out there that tell you to change the metric value to something lower than your wireless or ethernet interface. However no changes to the metric value made any difference in our case.
It was not until we came over Richard Hicks blog post on the issue that things made sense. Apparently there had been an issue in Windows 10 regarding DNS Registration with Always On VPN (versions 1803, 1809 and 1903). Our test machine was running 1909 and had the hotfixes already applied but still did not register its IP in our internal DNS. The final piece of the puzzle was to run the following command on our client and restart the device. After the restart the VPN automatically connected and DNS was updated instantly.
New-ItemProperty -Path ‘HKLM:SYSTEM\CurrentControlSet\Services\Dnscache\Parameters\’ -Name DisableNRPTForAdapterRegistration -PropertyType DWORD -Value 1 -Force
Hope this helps someone in the future


