In March of 2021 Microsoft deprecated HTTP-only communication in Configuration Manager to increase security. The first Configuration Manager release after Oct 31, 2022 will not support HTTP communication, hence its time to start planning and implementing HTTPS based communication in Configuration Manager (Enhanced HTTP can also be used). In this post we will go through the steps that are required in order to switch from HTTP-only to HTTPS based communication. Your environment needs a PKI (Public Key Infrastructure) to create the required certificate templates. See my post on implementing a two-tier PKI hierarchy if you dont have a PKI today.
- Creating Certificate Templates
- Enrolling Certificates
- Configure IIS and WSUS
- Enable HTTPS in Configuration Manager
Creating Certificate Templates
We need to make three certificate templates on our PKI (Public Key Infrastructure). If you already have a computer certificate deployed to your clients, the ConfigMgr Client Certificate might not be needed.
- ConfigMgr Web Server Certificate – This certificate needs to be installed any server that is hosting a web based role such as a Distribution Point or Management Point.
- ConfigMgr Distribution Point Certificate – This certificate does not actually need to be installed on any Distribution Point. We will enroll this on our site server (or management server if preferred), export the certificate and then import it to our Distribution Points in the Configuration Manager Console. The certificate will be used during Operating System Deployment (OSD).
- ConfigMgr Client Certificate – This is the certificate that will be distributed to end-user devices and siste servers so that they can communicate with our Configuration Manager infrastructure. Any system with the Configuration Manager agent should have this certificate.
ConfigMgr Web Server Certificate
On the Certification Authority duplicate the Web Server template.
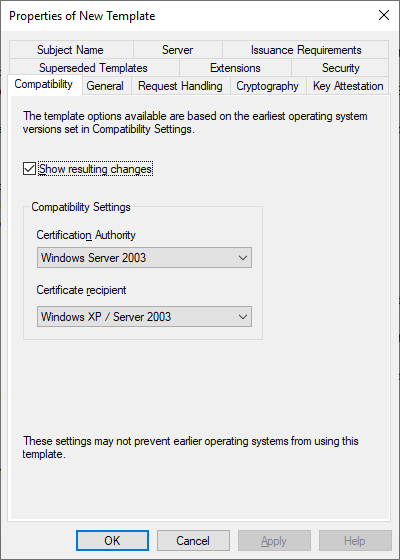
On the Compatibility Tab make sure that the following compatibility settings are set:
– Certification Authority: Windows Server 2003
– Certificate Recipient: Windows XP / Server 2003
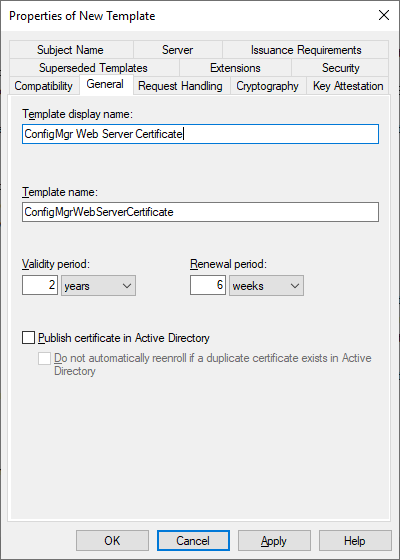
On the General tab provide a Template Display Name. The Template Name should be identical to the Template Display Name without spaces.
– Template Display Name: ConfigMgr Web Server Certificate
– Template Name: ConfigMgrWebServerCertificate
On the Request Handling tab make sure that the Allow Private Key to be exported is disabled.
On the Subject Name tab, make sure that Supply In Request is selected.
On the Security tab, add any server that hosts a web based role such as a Management Point or Distribution Point. If you Configuration Manager environment consists of multiple servers, consider adding all of the servers in a group. Make sure the group/server has the Read and Enroll permissions.
ConfigMgr Distribution Point Certificate
Duplicate the Workstation Authentication template on the Certification Authority.
On the Compatibility Tab make sure that the following compatibility settings are set:
– Certification Authority: Windows Server 2003
– Certificate Recipient: Windows XP / Server 2003
On the General tab provide a Template Display Name. The Template Name should be identical to the Template Display Name without spaces.
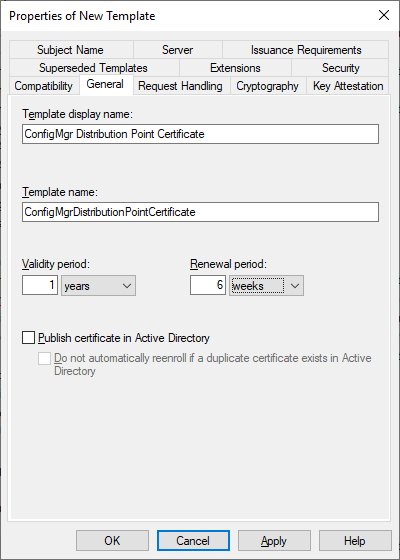
– Template Display Name: ConfigMgr Distribution Point Certificate
– Template Name: ConfigMgrDistributionPointCertificate
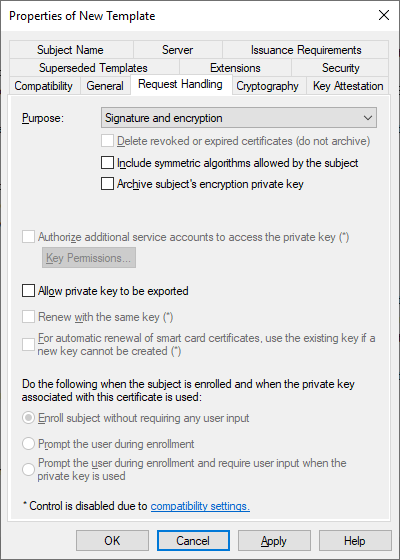
On the Request Handling tab make sure that the Allow Private Key to be exported is enabled.

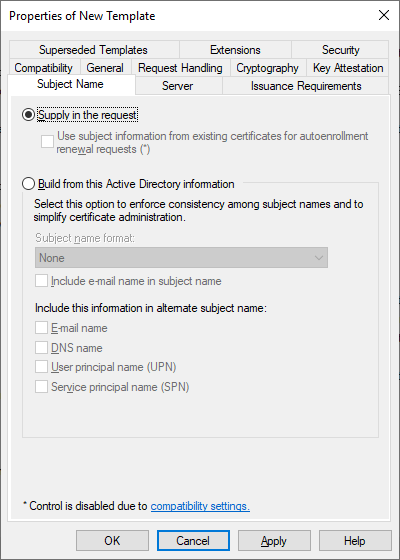
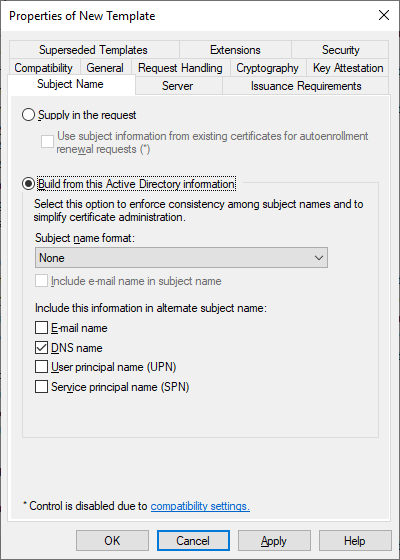
On the Subject Name tab, make sure that Build from this Active Directory information is selected.
– Subject Name Format: None
– Include this information in the alternate subject name: DNS
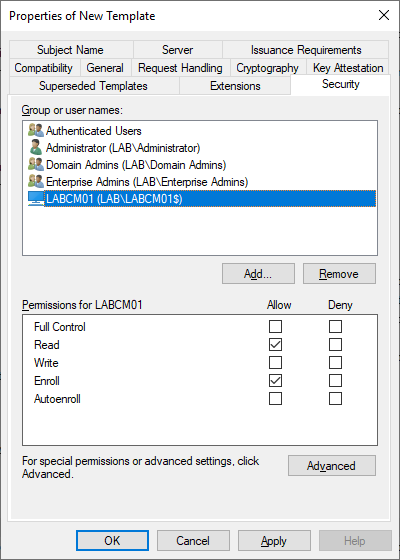
On the Security tab the defaults can be used. However if you dont want to make this certificate template available to all computers in the domain (including clients), then remove the Domain Computers group. If you created a group on the previous template replace Domain Computers with that group, or simply add the servers who should have permissions. Make sure that the Read and Enroll permissions are provided.
ConfigMgr Client Certificate
As mentioned before, if you have a Computer certificate on existing clients, then this template might not be required, given that your existing template meets the requirements. Regardless it should not cause any harm to have both a Computer certificate and this ConfigMgr Client Certificate.
Duplicate the Workstation Authentication template on the Certification Authority.
On the Compatibility Tab make sure that the following compatibility settings are set:
– Certification Authority: Windows Server 2003
– Certificate Recipient: Windows XP / Server 2003
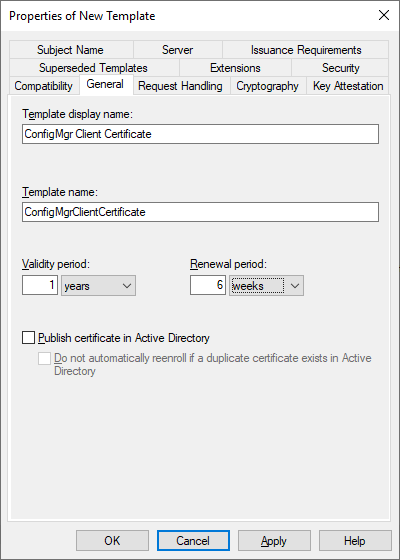
On the General tab provide a Template Display Name. The Template Name should be identical to the Template Display Name without spaces.
– Template Display Name: ConfigMgr Client Certificate
– Template Name: ConfigMgrClientCertificate
On the Request Handling tab make sure that the Allow Private Key to be exported is disabled.
On the Subject Name tab, make sure that Build from this Active Directory information is selected.
– Subject Name Format: None
– Include this information in the alternate subject name: DNS
On the Security tab click Domain Computers and make sure that Read, Enroll and AutoEnroll permissions are set. The AutoEnroll option will automatically enroll the certificate to all servers and clients in Active Directory.

Enrolling Certificates
In this lab environment all Configuration Manager roles are installed on a single Primary Site, hence we can simply enroll all three certificates on the single server. For environments that consist of multiple servers make sure to install the appropriate certificate as mentioned earlier:
- ConfigMgr Web Server Certificate – This certificate needs to be installed any server that is hosting a web based role such as a Distribution Point or Management Point.
- ConfigMgr Distribution Point Certificate – This certificate does not actually need to be installed on any Distribution Point. We will enroll this on our site server (or management server if preferred), export the certificate and then import it to our Distribution Points in the Configuration Manager Console. The certificate will be used during Operating System Deployment (OSD).
- ConfigMgr Client Certificate – This is the certificate that will be distributed to end-user devices and siste servers so that they can communicate with our Configuration Manager infrastructure. Any system with the Configuration Manager agent should have this certificate.
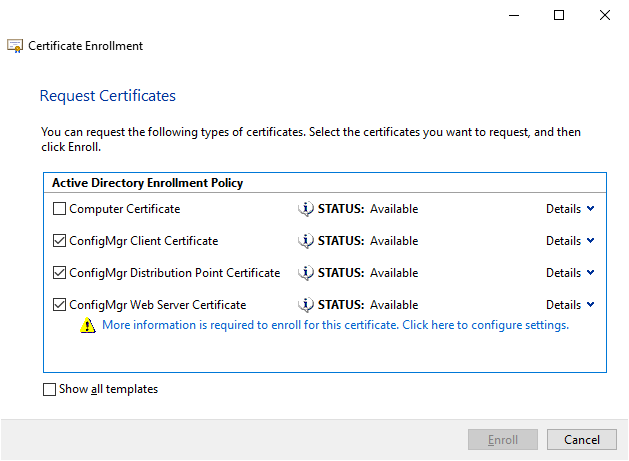
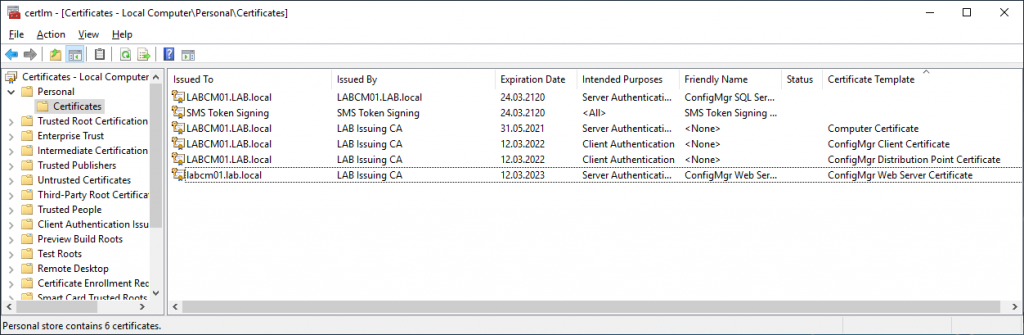
To enroll certificates, open the Local Machine Certificate store by running certlm.msc. Right click Personal and choose All Tasks -> Request New Certificate to bring up the Certificate Enrollment wizard. The three ConfigMgr templates that we created earlier should show up (if they dont review the security settings on the template). The ConfigMgr Web Server Certificate will require additional information before a certificate can be created. Click the blue text to configure these settings.
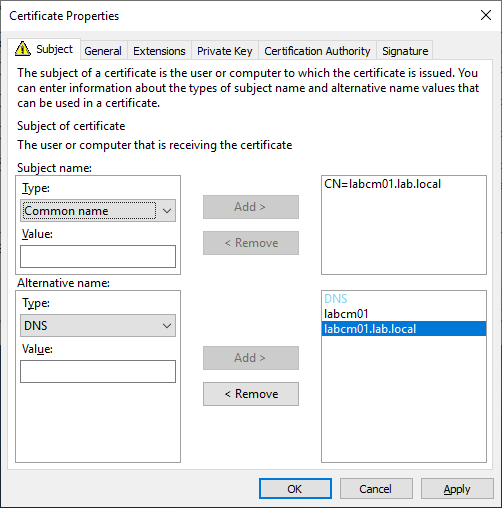
On the Subject tab, specify Common Name for the Subject Name
– Subject Name
Type – Common Name
Value – Fully Qualified Domain Name (FQDN) of the server
– Alternate Name
Type – DNS
Value – Hostname/Shortname and the FQDN of the server
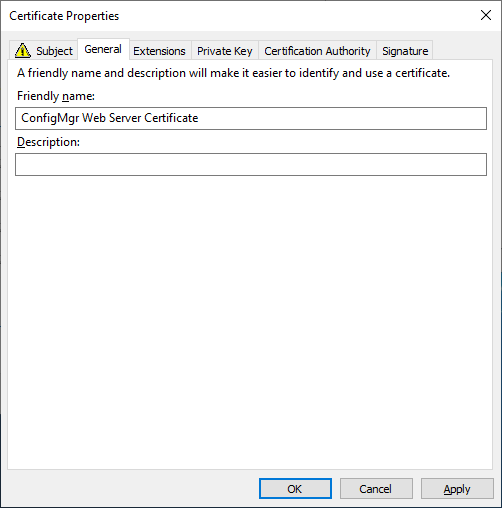
Switch to the General tab and specify a Friendly Name that will make it easy to identify later. Select Apply and OK then enroll the certificates.
We should now have all three certificates enrolled on our site server. As mentioned earlier, make sure to install the appropriate certificates on any additional servers.
Our final task will be to export the ConfigMgr Distribution Point Certificate so that we can use that later. Right click the ConfigMgr Distribution Point Certificate then select All Tasks -> Export. When asked to export the private key select yes, as we will need this when importing the certificate into Configuration Manager. Protect the file with a password (store the password securely) and save the PFX file to a convenient location such as the desktop. We will use this PFX file later.
- Export Private Key: Yes
- Format: PFX (default options)
Configure IIS and WSUS
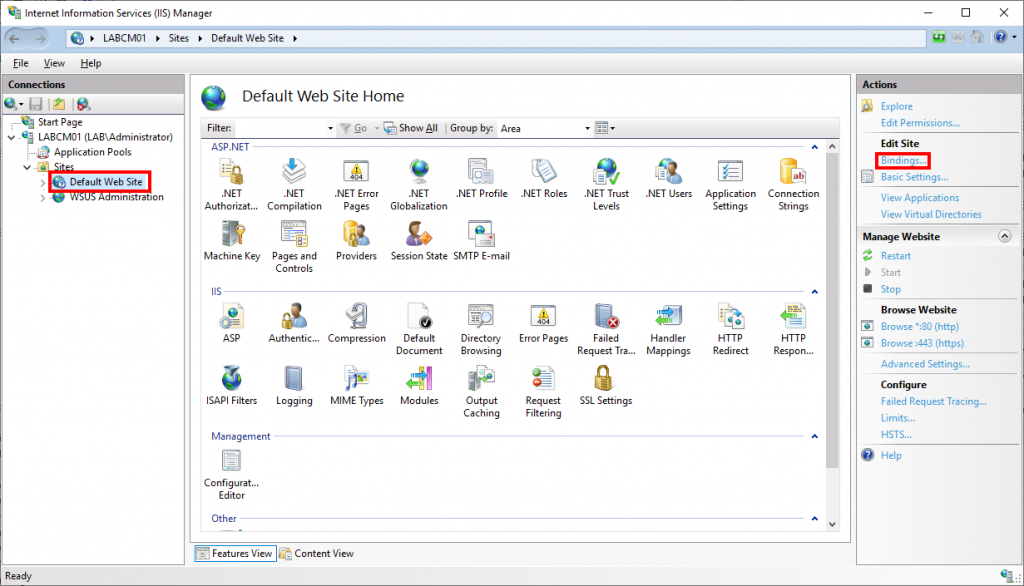
Now that we have our certificates in place we need to make sure that our webservers are using the correct certificates. Open Internet Information (IIS) Manager and select the Default Web Site and then press bindings on the right hand side. If you have a Windows Update Services integrated with Configuration Manager be sure to repeat these steps for the WSUS Administration website. There are some additional steps that must be done for the WSUS Administration website below.
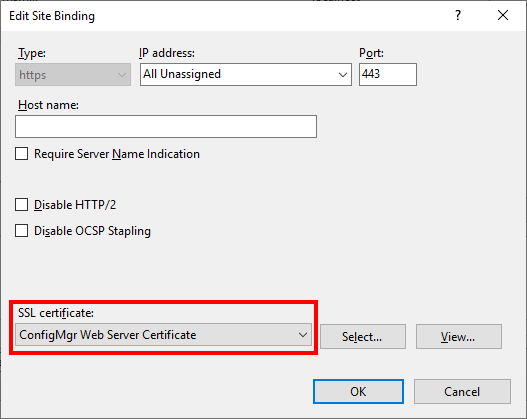
In the Site Bindings window select HTTPS and then click Edit. In the SSL Certificates list select the ConfigMgr Web Server Certificate that we created earlier (the friendly names are listed).
Additional WSUS Configuration
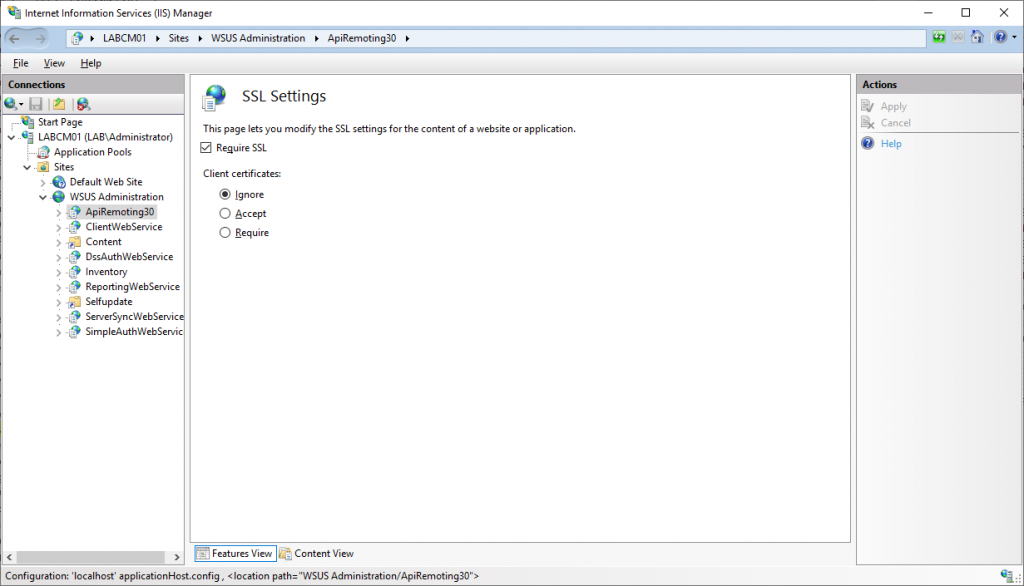
In addition to changing the bindings we also need to enable the Require SSL setting for the following virtual directories: APIRemoting30, ClientWebService, DSSAuthWebService, ServerSyncWebService and SimpleAuthWebService.
- In Internet Information Services (IIS) Manager expand the WSUS Administration website and select the the APIRemoting30 virtual directory.
- Select SSL Settings (padlock icon) in the middle of the screen
- Enable the Require SSL checkbox
- Verify that Client Certificates is set to Ignore
- Click Apply on the right hand side
- Repeat for the other virtual directories
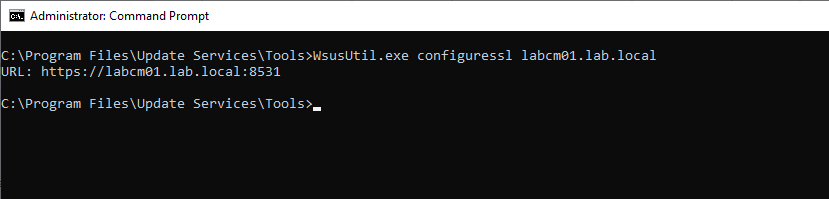
Then finally we can configure SSL using WsusUtil.exe from an administrative command line. The WsusUtil.exe tool is located in C:\Program Files\Update Services\Tools.
WsusUtil.exe configuressl labcm01.lab.local
Enable HTTPS in Configuration Manager
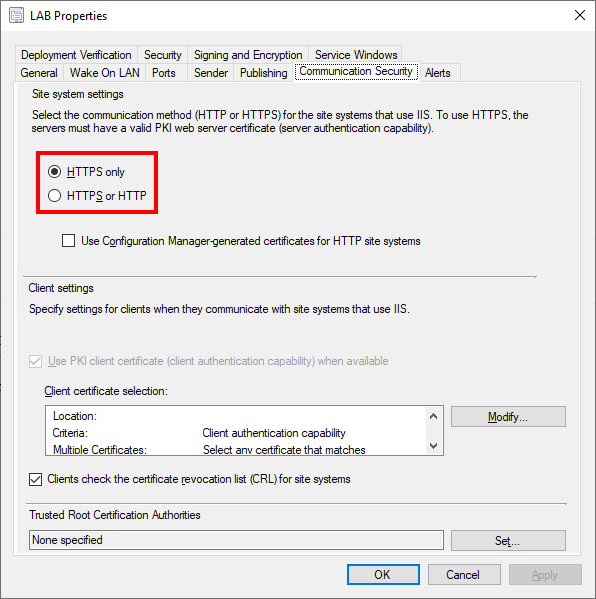
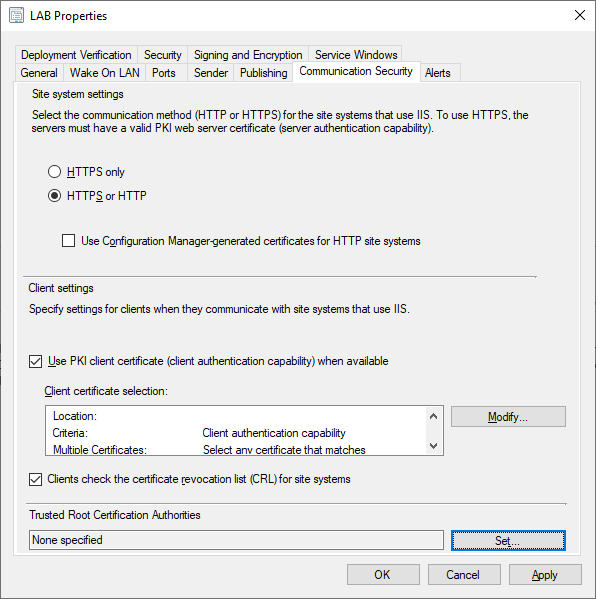
In the Configuration Manager Console select the Administration workspace, then select Sites under Site Configuration. Select the Properties of your primary site.
From here we can either enable HTTPS only which is our end goal, or use a mixed mode until we can verify that everything is working as intended. We can also enable HTTPS specifically for each role as noted below. Also note the checkbox to use PKI Client Certificate for clients if there is a certificate available. This will make the client prefer HTTPS communication given that an applicable certificate is available on the client. Since we distributed the ConfigMgr Client Certificate to all our endpoints previously, there should be a certificate available on our endpoints.
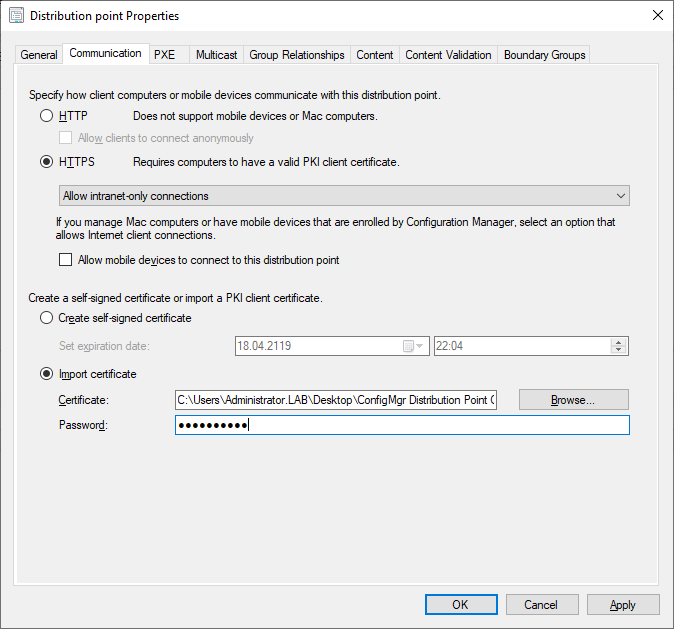
Distribution Point
Under Site Configuration select Servers and Site System Roles then select the server that contains the Distribution Point role. In the Communication tab select HTTPS and the Import the ConfigMgr Distribution Point Certificate PFX file that we exported to the desktop earlier. Select Apply and then OK. Configuration Manager will now reconfigure our Distribution Point for HTTPS mode, this process can be followed in distmgr.log.
If there are multiple servers in your environment the ConfigMgr Distribution Point Certificate PFX file can be re-used for each Distribution Point in the environment if desired.
Management Point
Under Site Configuration select Servers and Site System Roles then select the server that contains the Management Point role. Select HTTPS and select Apply then OK. Configuration Manager will now reinstall the Management Point using HTTPS. The process can be followed in sitecomp.log, mpsetup.log, mpMSI.log, mpcontrol.log and does take a few minutes to complete.

To verify that the Management Point is working we can either check the mpcontrol.log or query the Management Point through a URL. The mpcontrol.log periodically checks if the Management Point is responding. If the Management Point is working the log would contain something like this:
Successfully performed Management Point availability check against local computer
SSL is enabled.
Using thread token for request
Call to HttpSendRequestSync succeeded for port 443 with status code 200, text: OK
Http test request succeeded.
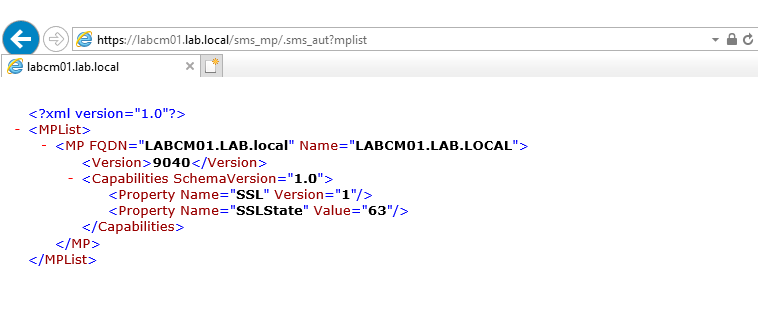
We can also query the Management Point through a browser.
https://labcm01.lab.local/sms_mp/.sms_aut?mplist
https://labcm01.lab.local/sms_mp/.sms_aut?mpcert
When using HTTP these URL’s work fine, however with HTTPS you might get a HTTP Error 403.7 – Client Certificate Required. This error is expected and we can re-use our ConfigMgr Distribution Point Certificate that we exported earlier to circumvent this issue.
In Internet Explorer Options, select the Content tab and then click Certificates. Import the ConfigMgr Distribution Point Certificate that we exported earlier, however do not include the private key. Once completed (restart of Internet Explorer might be needed) the URL should display something like this if the Management Point is working.
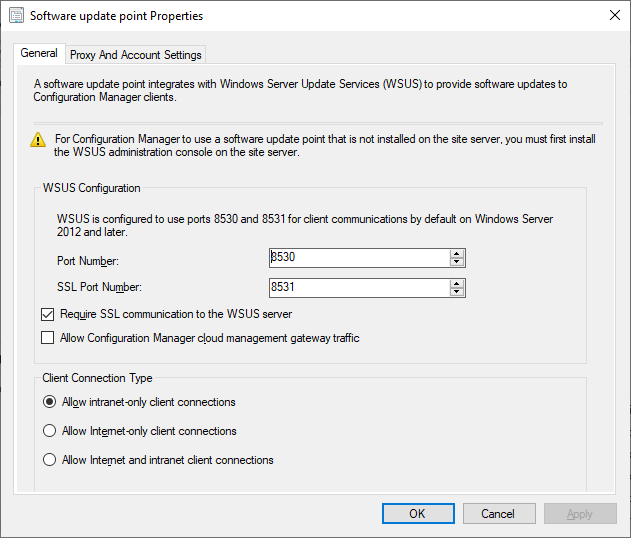
Software Update Point
Under Site Configuration select Servers and Site System Roles then select the server that contains the Software Update Point role. Select Require SSL Communication to the WSUS Server then press Apply and OK. Configuration Manager will now update the configuration. The process can be followed in wcm.log.
Other Roles
If you have other roles in your Configuration Management, review the HTTPS requirements for those roles in Microsofts documentation.
Client Verification
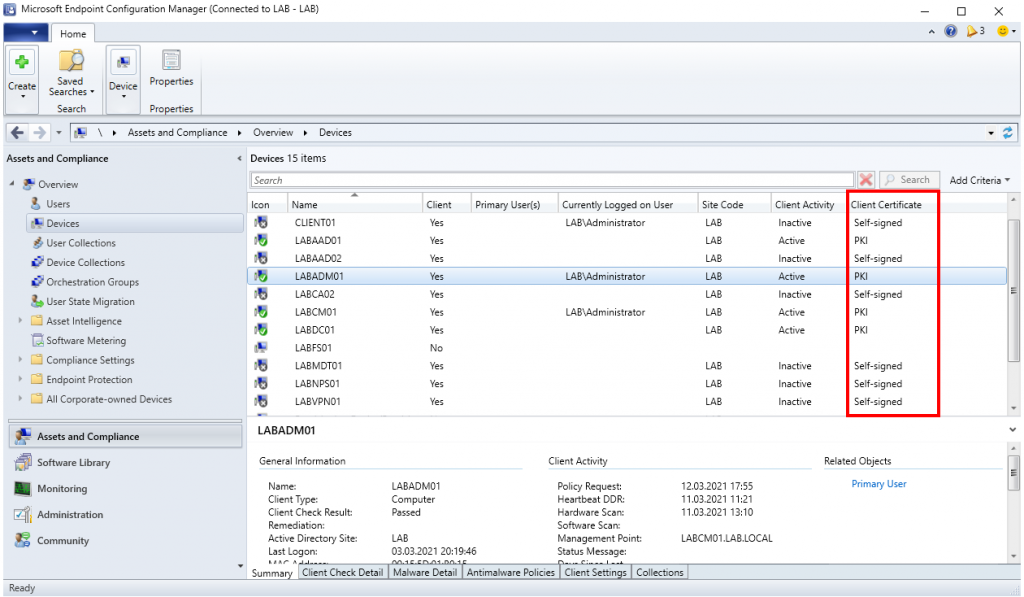
Once communication has been switched to HTTPS on the Primary Site, clients will begin to communicate using HTTPS automatically given that a certificate is present on the client. To verify this open the Configuration Manager Properties from the Control Panel. The Client Certificate property should say PKI if HTTPS is being used. If the client has not switched to PKI mode even if there is a certificate present on the system, try restarting the Configuration Manager Agent Service (SMS Agent Host). Restarting the service speeds up the process, but the client will attempt HTTPS communication eventually.
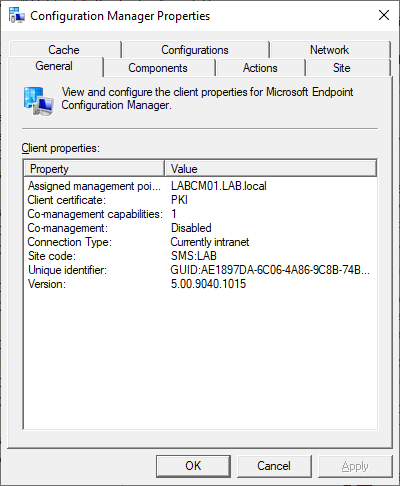
It is also possible to monitor this change in the Configuration Manager Console. In the list of all Devices enable the Client Certificate column and this will indicate if the client is using a self-signed certificate or PKI.