
Overview
In these series of posts, we will go through the steps required to install Configuration Manager in a simple LAB environment. The LAB environment will be referenced in future posts as we explore Configuration Manager further. Since Hyper-V is nicely integrated in Windows 10 we will be using that to create the Virtual Machines, but it’s possible to use other software such as VMWare Workstation, VirtualBox, Parallels etc. All of the Configuration Manager Roles and SQL Server will be installed on the same server, this is also a possible scenario that could be used in production for smaller environments. Below is a quick overview of how the LAB will be setup.
Quick Jump:
Part 1 – Overview and Domain Controller installation
Part 2 – Management Server Installation
Part 3 – Installing SQL Server
Part 4 – Configuration Manager Prerequisites
Part 5 – Installing Configuration Manager
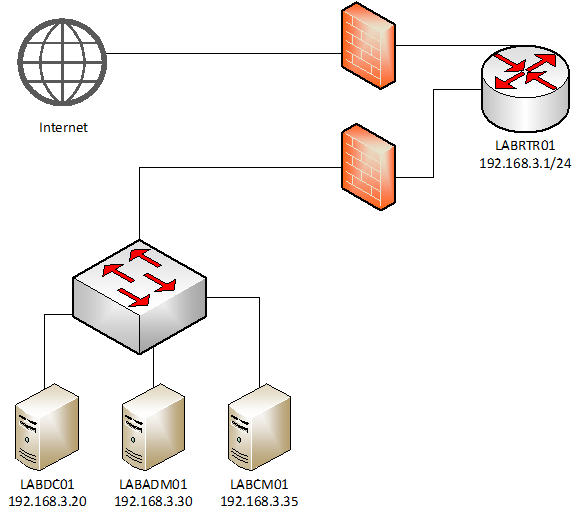
The lab will consist of the following virtual machines:
LABRTR01 – Router
- 1x CPU
- 1GB RAM
- Disk 10GB (OS)
- Interface 1 (LAN):
- IP: 192.168.3.1
- Mask: 255.255.255.0
- DNS: 192.168.3.20
- Gateways: none
- Interface 2 (WAN):
- DHCP
Note: Installing the Router is optional. In my case I am running a basic pfSense router that can be freely obtained at www.pfsense.org/download. Setup of this will be covered in a later post.
LABDC01 – Domain Controller
- 2x CPU
- 4GB RAM
- Disks: OS (127GB)
- Interface 1 (LAN)
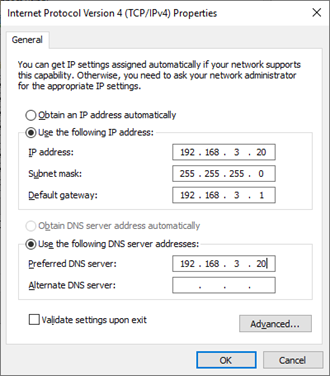
- IP: 192.168.3.20
- Mask: 255.255.255.0
- DNS: 192.168.3.20
- Gateway: 192.168.3.1
LABCM01 – Configuration Manager Server
- 4x CPU
- 8GB RAM
- Disks: OS (127GB), Data/SCCM (60GB), DP (50GB), Content (50GB)
- Interface 1 (LAN)
- IP: 192.168.3.35
- Mask: 255.255.255.0
- DNS: 192.168.3.20
- Gateway: 192.168.3.1
Note: A best practice is to install Configuration Manager and SQL on its own disk, especially in enterprise environments. In the guide we will simulate different disks by having a total of 4 virtual hard drives in the VM but in reality, they are all running from the same physical drive.
LABADM01 – Administration Server
- 2x CPU
- 4GB RAM
- Disks: OS (127GB)
- Interface 1 (LAN)
- IP: 192.168.3.30
- Mask: 255.255.255.0
- DNS: 192.168.3.20
- Gateway: 192.168.3.1
Note: Installing the Administration server is optional, however it lets us manage our entire environment from a single server.
Obtaining Software
All the software used in this guide can be downloaded from Microsoft’s Evaluation Center and be used free of charge for up to 180 days, which is perfect for a LAB like this. If you have a Volume License, MSDN or Visual Studio Subscription the software can be obtained from the respective locations, including license keys.
Windows Server
We will be using Windows Server 2019 in the guide, on a general basis the latest version is always recommended. If for any reason you prefer Windows Server 2016 it makes little difference in the terms of this guide. If you are downloading the software from Microsoft’s Evaluation Center, then make sure you either download the ISO or VHDX file, I prefer the ISO files as they can be reused on other virtualization platforms other than Hyper-V.
Configuration Manager
System Center Configuration Manager (SCCM / ConfigMgr) or Microsoft Endpoint Configuration Manager (MECM), as it is now called after Microsoft’s rebranding at Ignite 2019, comes in two variants. The first is Current Branch which is the version you would use in a production environment, and is available for use up to 180 days without a license (upgradable to the full version). The Technical Preview Branch is actually free to use and does not require a license, however it only supports a maximum of 10 clients, does not allow for import or export of data and must be upgraded within 90 days of each monthly release. The Preview Branch also contains new features that may or may not end up in the final product and is intended for LAB purposes only. Microsoft has more information on the differences here: https://docs.microsoft.com/en-us/configmgr/core/understand/which-branch-should-i-use.
In this guide we will be installing the Current Branch version, but the install procedure will be identical for the Technical Preview Branch. In addition we will need to download additional components such as the Windows 10 Assessment and Development Kit (ADK) but we will cover that later.
SQL Server
At the time of writing I would suggest using either SQL Server 2016 or SQL Server 2017. In order to support SQL Server 2019, we need to be running Configuration Manager Current Branch 1910 or newer and the latest setup files in the Evaluation Center are 1902. We will upgrade to the latest version of Configuration Manager post installation and can migrate our installation to SQL 2019 later.
SQL Server 2016
SQL Server 2017
SQL Server 2019
Basic Server Configuration
Before we start installing and configuring our first Domain Controller, we need to 4 simple tasks:
- Change the computer name
- Assign a static IP address
- Disable IE Enhanced Security Configuration
- Install the latest Windows Updates
Logon to LABDC01 which should be a freshly installed Windows Server 2019 installation, wait for Server Manager to appear. All of the prerequisites tasks can be completed straight from Server Manager. If you prefer to use PowerShell, the script below will make the required changes (except running Windows Update) and restart the server.
Rename-Computer -NewName LABDC01
Write-Host "Computer Name Changed"
$AdminKey = "HKLM:\SOFTWARE\Microsoft\Active Setup\Installed Components\{A509B1A7-37EF-4b3f-8CFC-4F3A74704073}"
$UserKey = "HKLM:\SOFTWARE\Microsoft\Active Setup\Installed Components\{A509B1A8-37EF-4b3f-8CFC-4F3A74704073}"
Set-ItemProperty -Path $AdminKey -Name "IsInstalled" -Value 0
Set-ItemProperty -Path $UserKey -Name "IsInstalled" -Value 0
Write-Host "Disabled IE Enhanced Security Configuration"
New-NetIPAddress -InterfaceAlias "Ethernet" -AddressFamily IPv4 -IPAddress 192.168.3.20 -PrefixLength 24 -DefaultGateway 192.168.3.1
Set-DnsClientServerAddress -InterfaceAlias "Ethernet" -ServerAddresses 192.168.3.20
Write-Host "IP address and DNS set"
Set-ItemProperty -Path "HKLM:\System\CurrentControlSet\Control\Terminal Server" -Name "fDenyTSConnections" –Value 0
Enable-NetFirewallRule -DisplayGroup "Remote Desktop"
Write-Host "Enabled Remote Desktop"
Restart-Computer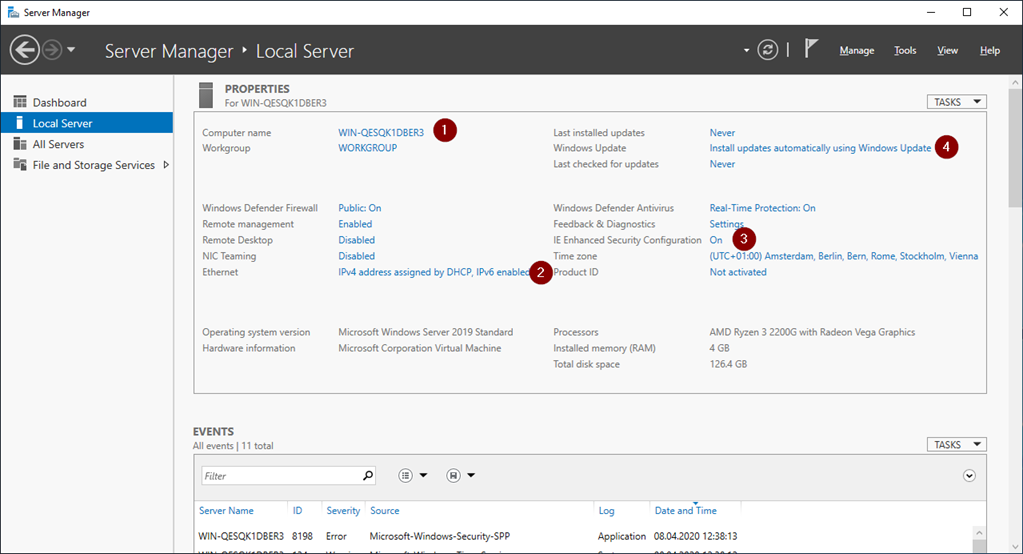
Our first task is to change the computer name to LABDC01.
1. Click on the current computer name and press the Change button and enter LABDC01 as the new name. Hit Apply and close the dialogs. If you are asked to restart, select No.

2. Click on the Ethernet setting and change the IP address and DNS settings.
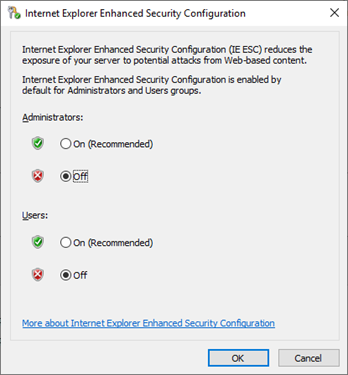
3. Click on the IE Enhanced Security Configuration and select Off for both Users and Administrators. This step is optional, but I prefer to disable it.
4. I would always recommend updating the operating system with the latest security patches before starting any installation. However we do not have internet connectivity at this point so updates will be installed after completing the Domain Controller installation.
Note: If you would like to update your VM with the latest updates at this point it might be required to change the DNS settings. If so, go back into the IP settings and change the DNS server to something like 1.1.1.1 or 8.8.8.8. Once the server is patched change the DNS setting back to 192.168.3.20.
Now that basic configuration has been completed, we can continue installing the Domain Controller. Make sure you restart the server before continuing.
Installing the first Domain Controller
After the server has been restarted it’s time to install the Domain Controller itself. Since there are quite a lot of dialogues the time this takes can be significantly reduced by using the following two lines of PowerShell code. Make sure to change the SafeModeAdminstratorPassword, this is a recovery password that can be used in the event that there is a problem with the Domain Controller. The server will automatically restart once complete and you can logon using your LAB\Administrator account. The password for the LAB\Administrator account will be the same as the local Administrator account (the password was set during Windows installation).
Install-WindowsFeature -Name AD-Domain-Services -IncludeManagementTools -Verbose
Install-ADDSForest -DomainName lab.local -SafeModeAdministratorPassword (Convertto-SecureString -AsPlainText "Password1!" -Force) -Verbose -Force
Should you want to install the Domain Controller manually here are the steps:
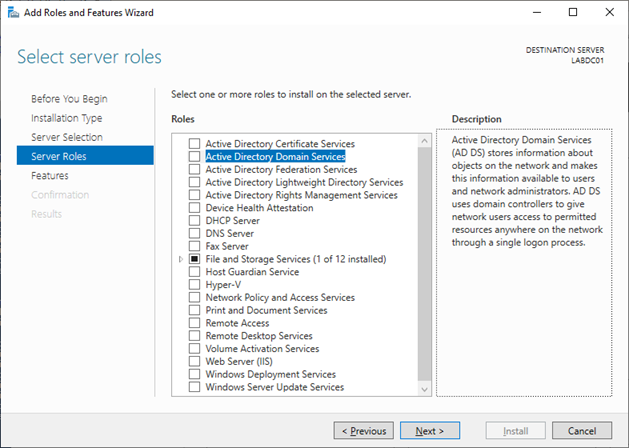
Open Server Manger and select Add Roles and Features.
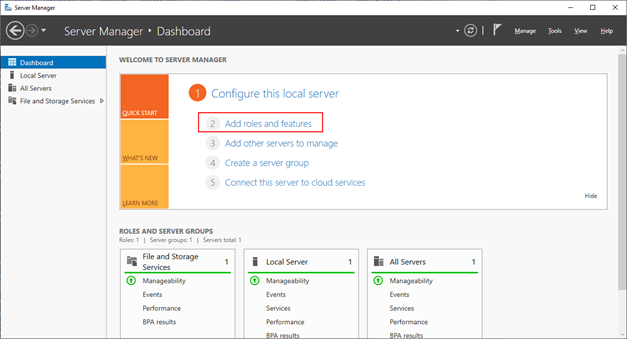
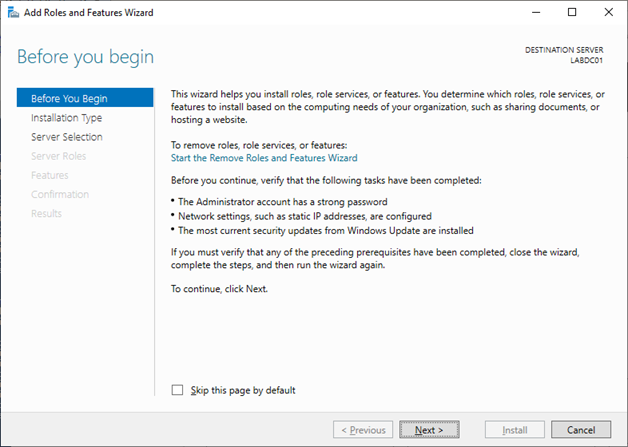
Select Next to continue the wizard.
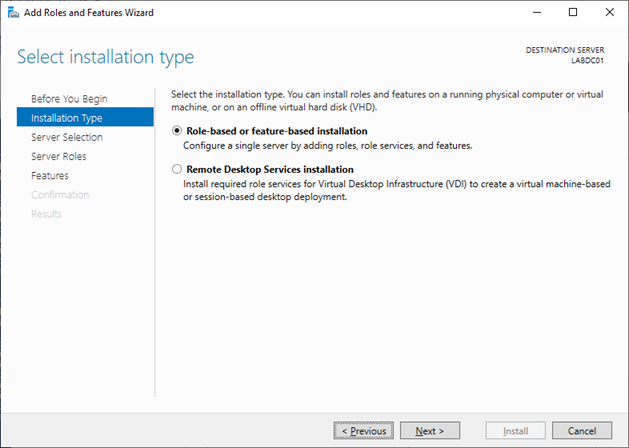
Select Role Based or feature based installation.
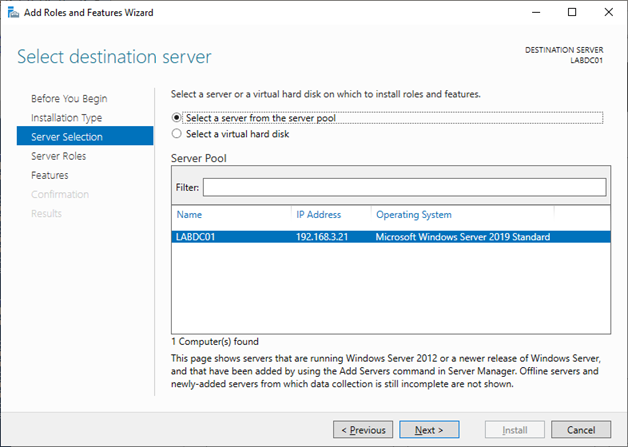
Select the Server (you should have only one).
Select Active Directory Domain Services
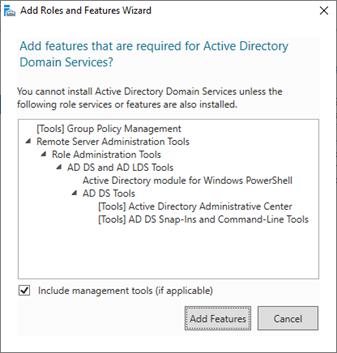
Once Active Directory Domain Services is selected you need add the management tools, click Add Features and click Next
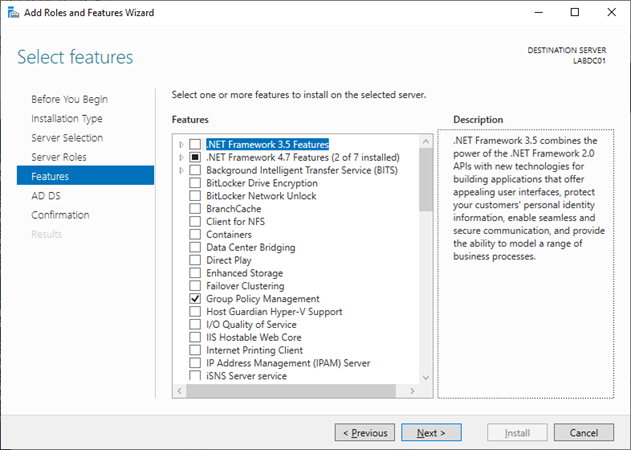
Since all the required features were added in the previous step we can just click Next.
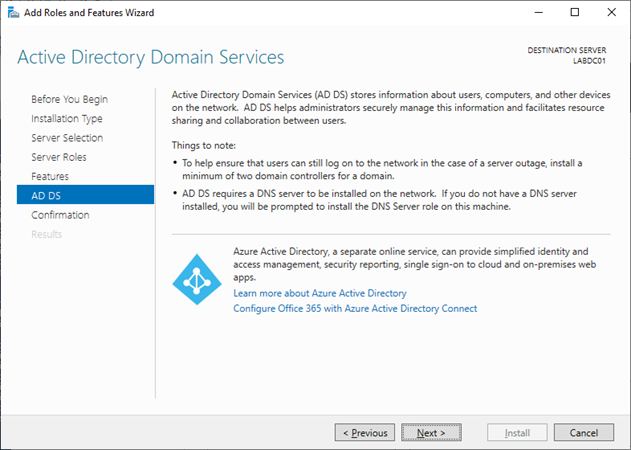
Review the notes for Active Directory Domain Services and click Next.
Press the install button to begin install the required tools. Automatically restart can be selected if desired, but a restart will not be required.

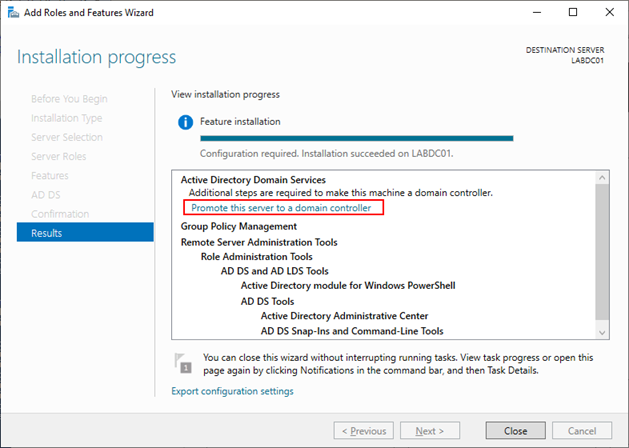
Once the installation is complete, click “Promote this server to a domain controller”. If you accidentally closed the window, it can be opened again from Server Manager by clicking on the Flag at the top of the screen.
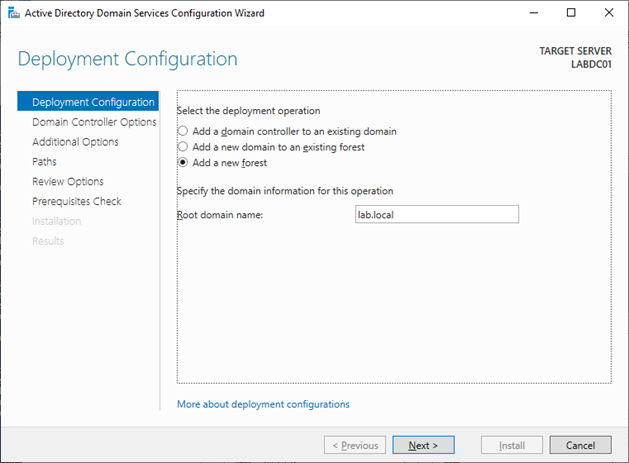
Select Add a new Forest and enter lab.local or any other domain name that you wish to use. This cannot be changed after installation.
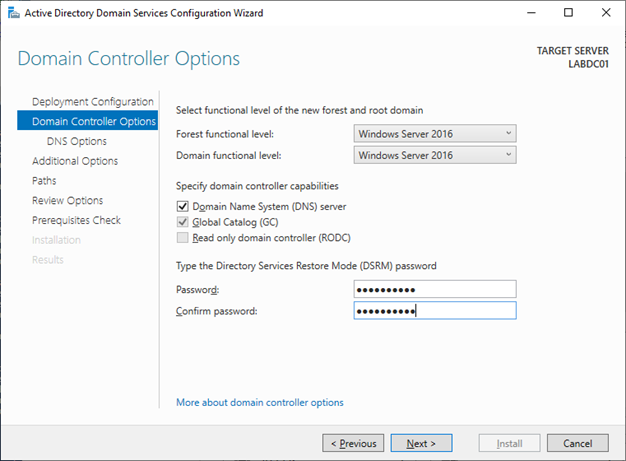
Keep the defaults and specify a password that can be used to recover the server (this is not the administrator password).
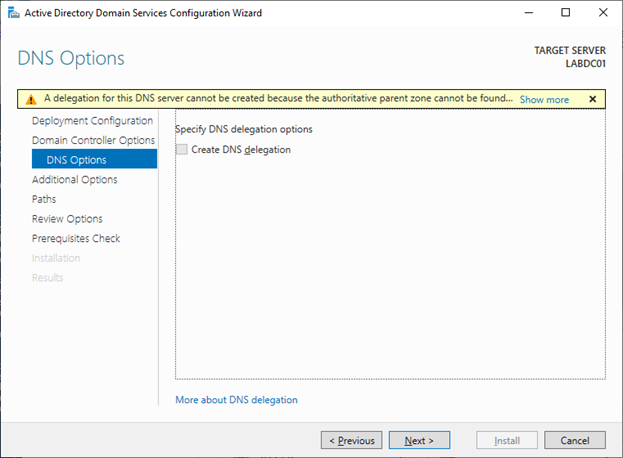
Leave the DNS options and select Next.
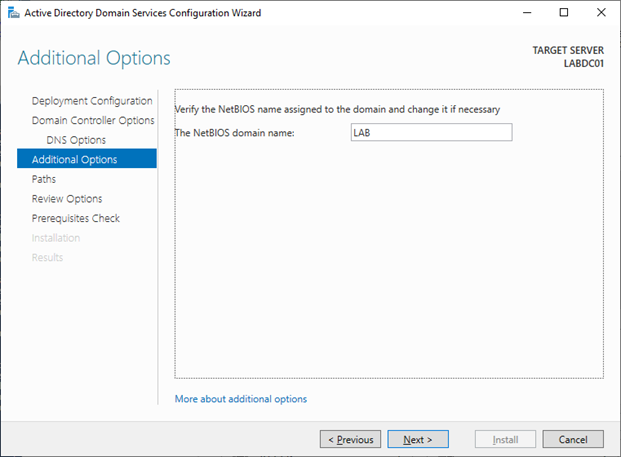
Specify the NETBIOS name or keep the defaults (recommended)
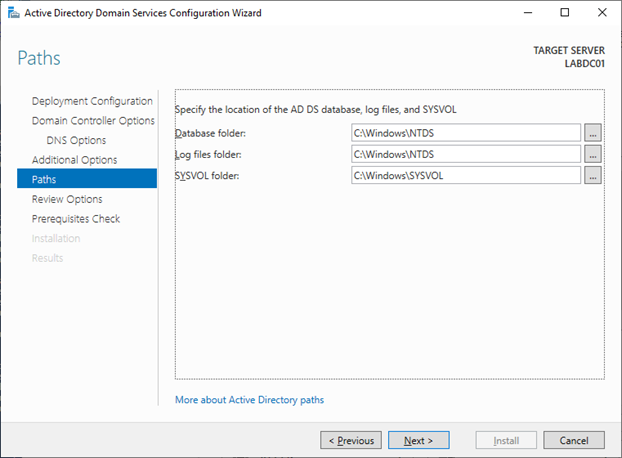
Specify a location to store the Active Directory Database. Unless you have a very good reason just keep the defaults.
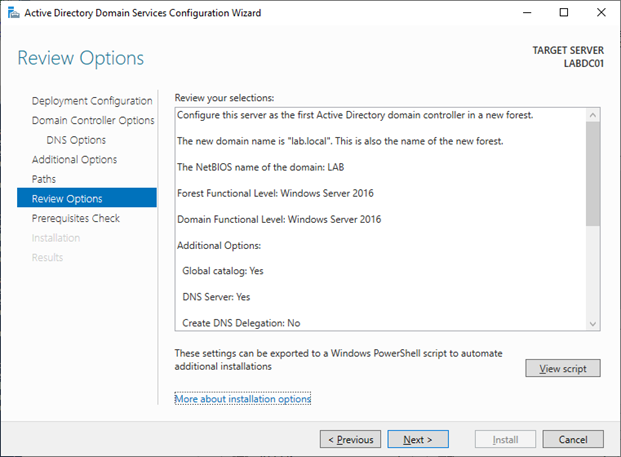
Review your settings and click Next
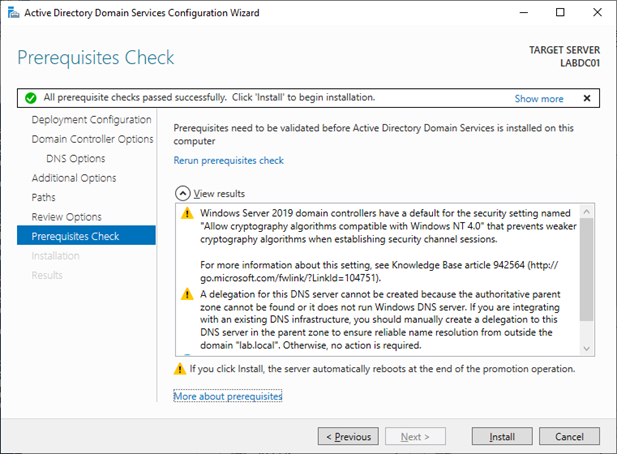
Click Install to begin.
After the install is completed the server should restart automatically and you should be able to logon with your LAB\Administrator account. Congratulations you have now installed Active Directory Domain Services (ADDS). Before we wrap things up we need to make one change on our Domain Controller so that we can resolve external domains (reach the internet) by adding one or more forwarder in DNS. This can be done with the following Powershell command:
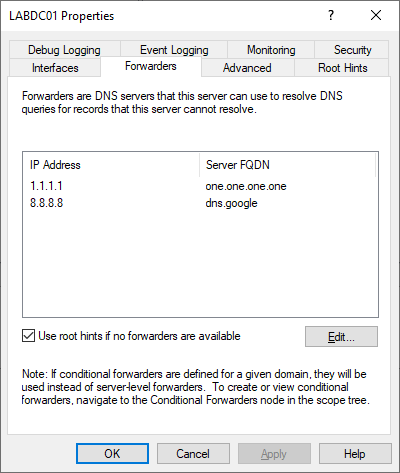
Set-DnsServerForwarder -IPAddress 1.1.1.1, 8.8.8.8Alternatively here is how to make the change manually: In Server Manager select DNS from the Tools menu (upper right) to open the DNS Manager. DNS Manager can also be opened from Administrative Tools in the Control Panel or Start Menu.
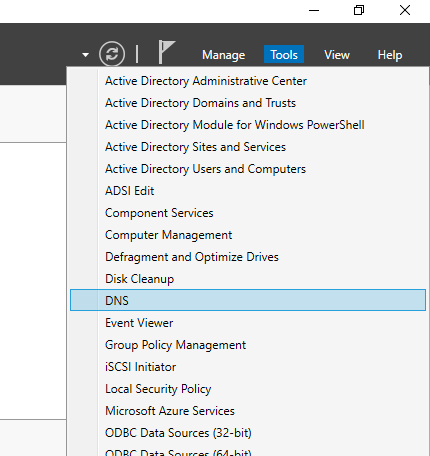
Next, right click on the server name and select Properties. Select the Forwarders tab and add one or more external DNS servers. In this example Cloudflare and Google’s public DNS servers are used, but its possible to use others such as your ISP.
Verify that DNS is now working by attempting to resolve an external domain such as google.com, this can be done by issuing the command: nslookup google.com or ping google.com from a command prompt.
That’s it for this post, in the next part we will be installing the Management Server LABADM01, joining it to the domain and installing our management tools so that we can use LABADM01 to administer the other servers in our domain.

