

LAPS or Local Admin Password Solution is a solution that automatically generates a unique local administrator password and writes that password back to Active Directory. This way each client or server has a unique local administrator password based on a set password policy. If we go back a few years many organizations used a GPO (Group Policy Object) to specify the local administrator password, some even do this today. Having the same administrator password on all clients in the organization is very convenient for administrators and helpdesks, but extremely unsecure. If a single device within the organization was compromised, an attacker would have access to all the other clients and servers where that particular GPO was applied. LAPS was released initially back in 2015, but unfortunately I still see customers that still have not implemented this best practice from Microsoft. In this post I will be walking through how to implement LAPS in an on-premise Active Directory Environment.
Microsoft has not implemented a similar tool for its Azure Active Directory joined devices. From what I understand it is something Microsoft is considering, but there is no timeframe as of now. See my post on Administering Local Administrator Access using Privileged Identity Management (PIM), this is probably the best Microsoft solution for Azure AD joined devices. If you would like to use a community tool check out CloudLAPS.
Contents
- Requirements
- Extending the Active Directory Schema
- Specifying Permissions
- Group Policy
- Deploying LAPS to Clients/Servers
- Verifying
- Troubleshooting
Requirements
- Downloaded LAPS from Microsoft here.
- Active Directory environment
- Test Client or Server
- Schema Admin
- Domain Admin (GPO and Delegation rights)
- Local Admin access on an existing Management Server / Domain Controller
- Preferably a Management System Like Configuration Manager but not required.
Extending the Active Directory Schema
LAPS does not require any specific Functional Level or Domain level, however the Active Directory schema must be extended to allow for two new attributes on the computer object.
ms-Mcs-AdmPwd – This attribute stores the local administrator password.
ms-Mcs-AdmPwdExpirationTime – defines when the password will expire and automatically changed.
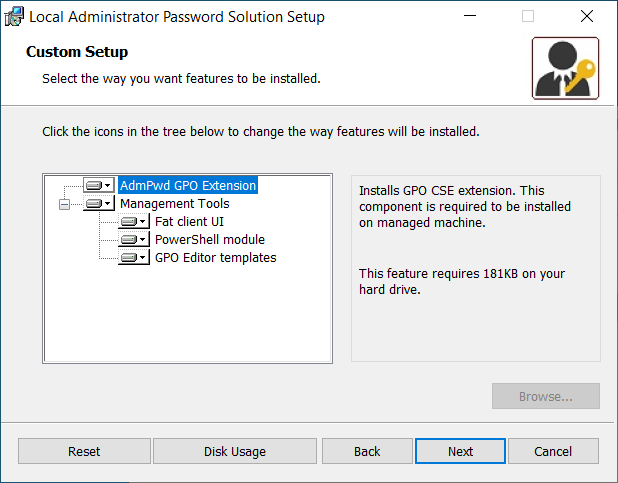
- Install the LAPS on your Management Server / Domain Controller. Make sure that the all of the management tools are selected for installation. We will create a client installation package later.
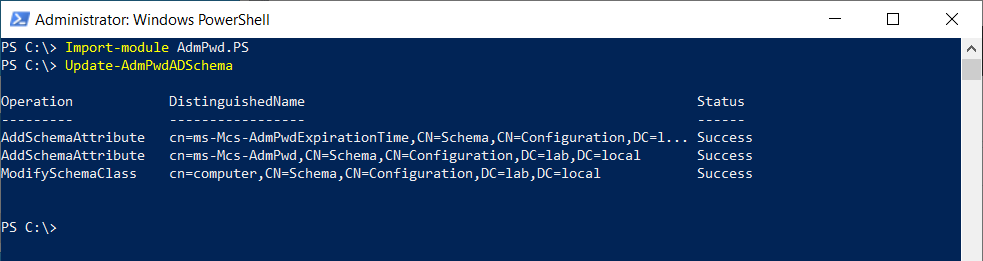
- Open PowerShell as an Administrator and import the LAPS PowerShell module.
Import-module AdmPwd.PS
- Extend the Schema using PowerShell.
Update-AdmPwdADSchema
Caution: Making changes to the Active Directory Schema is a big change in production environments. I recommend a restart of the domain controller and the management server before and after making change to the schema. Remember that it can take a while for larger environments to replicate the changes.
Now that the schema has been extended with the attributes we need for LAPS we can start assigning permissions.
Specifying Permissions
- Firstly we need to give our devices the ability to write the LAPS password back to Active Directory by using the following PowerShell cmdlet. Repeat the command for all OU’s that contain devices.
Set-AdmPwdComputerSelfPermission -Identity "OU=Clients,OU=LAB,DC=lab,DC=local"
- To allow support and operations teams to read passwords, a new group called LAPSReaders has been created. To delegate the appropriate permissions to the AD group use the following PowerShell cmdlet.
Set-AdmPwdReadPasswordPermission -OrgUnit "OU=Clients,OU=LAB,DC=lab,DC=local" -AllowedPrincipals LAB\LAPSReaders
- To find what security principals have access (extended rights) to a particular OU and also verify that the LAPSReaders were given permissions, use the following PowerShell cmdlet.
Find-AdmPwdExtendedrights -identity "OU=Clients,OU=LAB,DC=lab,DC=local"
To prevent certain users or groups from reading the passwords the Extended RIghts attribute for those users need to be removed. To do this open ADSI Edit (adsiedit.msc) and connect to the Default Naming Context. Navigate to the OU that contains devices, right click the OU and select Properties. Select the Security tab then click Advanced. Locate the user/group that should not have access and click Edit. Remove the All Extended Rights attribute and repeat for any other device OUs.
Note: Removing the All Extended Rights could impact other services and applications used in the organization. Verify that this does not cause issues in your environment.
Group Policy
Our next task is to create a Group Policy that will be used to define our password complexity, length and password age that LAPS will generate. When we initially installed LAPS on our Management Server / Domain Controller the AdmPwd.admx and AdmPwd.adml files were installed into the C:\Windows\Policy Definitions folder. If your environment has been configured with a central store for Group Policy objects (most likely the case for enterprises) then these two files need to be copied to the central store. If a central store is not configured make sure the two files are present on the domain controllers Policy Definitions folder.
- Open the Group Policy Management Editor
- Create a new policy for LAPS
- Edit the LAPS policy and navigate to Computer Configuration -> Policies -> Administrative Templates -> LAPS. If the LAPS folder is not present then the AdmPwd.admx anf AdmPwd.adml files have not been copied correctly.
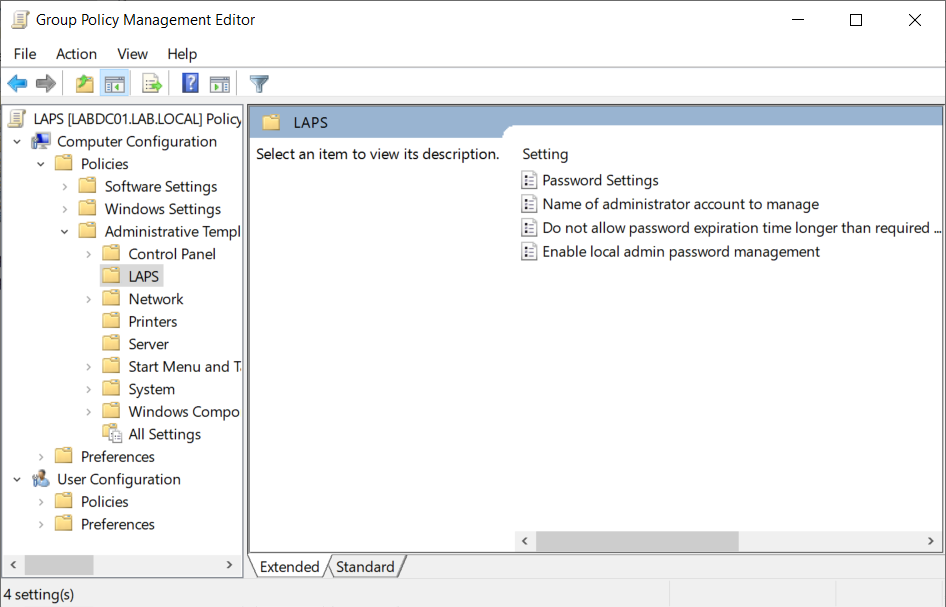
- Start by setting the Enable local admin password management to Enabled. If this setting is set to anything other than Enabled, LAPS will not perform any password management.
- Open Password Settings and set the policy to Enabled. Configure the password complexity, length and password age to fit your needs.
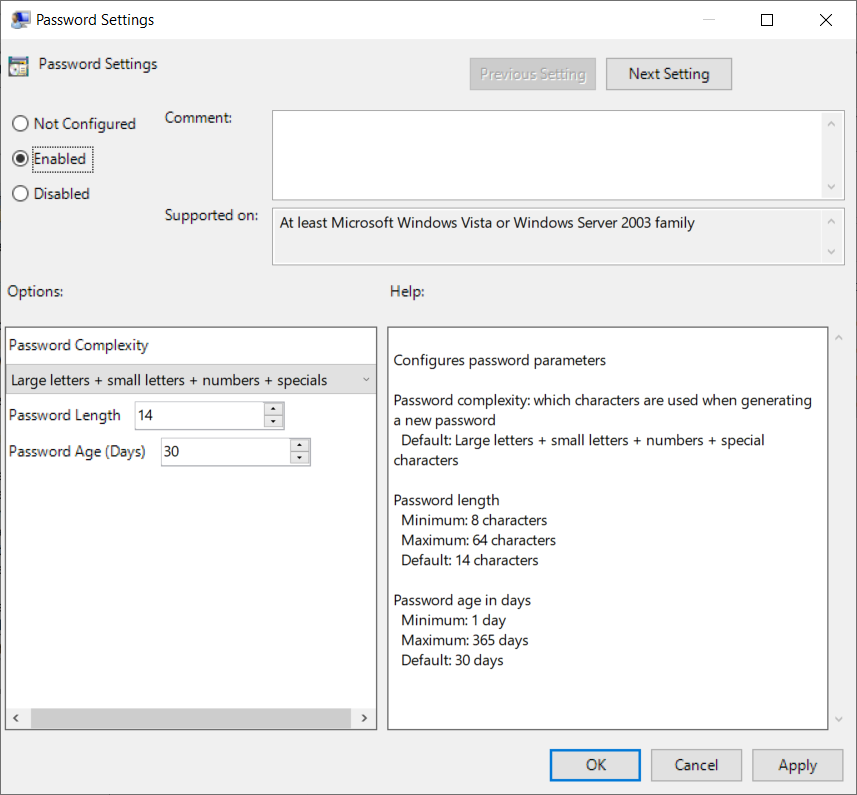
- Next set the Do not allow password expiration time long that required by policy to Enabled. This setting enforces the password age specified in Password Settings. If this setting is set to disabled or not configured passwords can have a longer password age than the value specified in Password Settings.
- The last setting Name of administrator account to mange should only be configured if LAPS will not administer the built-in Administrator account (even if this account has been renamed. The SID remains the same even if the account is renamed). If a dedicated account is used specify it here. For this walkthrough we will be using the built-in Administrator account and hence this option will be left unconfigured.
Deploy LAPS to Clients/Servers
In order for LAPS to work correctly on clients and servers the LAPS software needs to be installed. In this environment we will leverage Group Policy to install LAPS to our devices, for larger organizations a management system like Configuration Manager is preferred. When we initially installed LAPS on our Management Server / Domain Controller we installed all the management tools, these are not required on the endpoints.
- Copy the installation file to a central location. Since we will be using Group Policy to deploy the software we will simply use the NETLOGON share to host the installation media.
- Open the Group Policy Management Editor and edit the LAPS policy that we created earlier.
- Navigate to Computer Configuration -> Policy -> Software Installation.
- Right click Software Installation -> New -> Package. Specify the network path to the installation file, in my example it would be \\lab.local\NETLOGON\LAPSx64.msi.
- Once the installation package is selected choose Assigned
Group Policy will now install the LAPS software on all devices the GPO is applicable to. Software installations are only done prior to user logon, meaning that the device will receive the Group Policy but the installation wont be triggered while we are logged on. For testing purposes run gpupdate from the command line and restart the client/server to trigger the installation.
Verifying
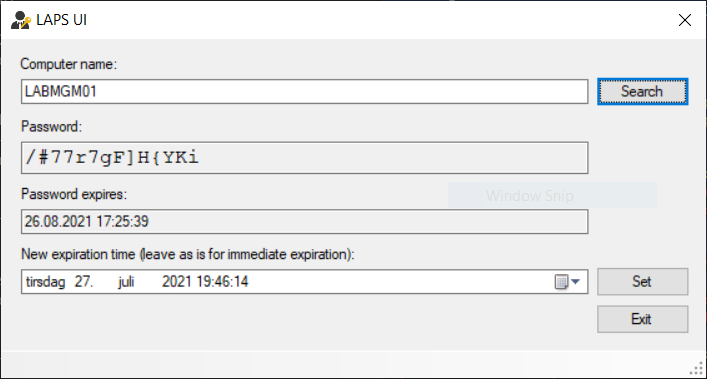
The LAPS UI tool should be installed on the Management Server / Domain Controller where we installed the management tools. This is the tool that you should make available to your helpdesk or any other personnel that needs access to the local administrator credentials. The password will automatically be changed by the policy once the password age expires, alternatively an administrator can change the expiration time.
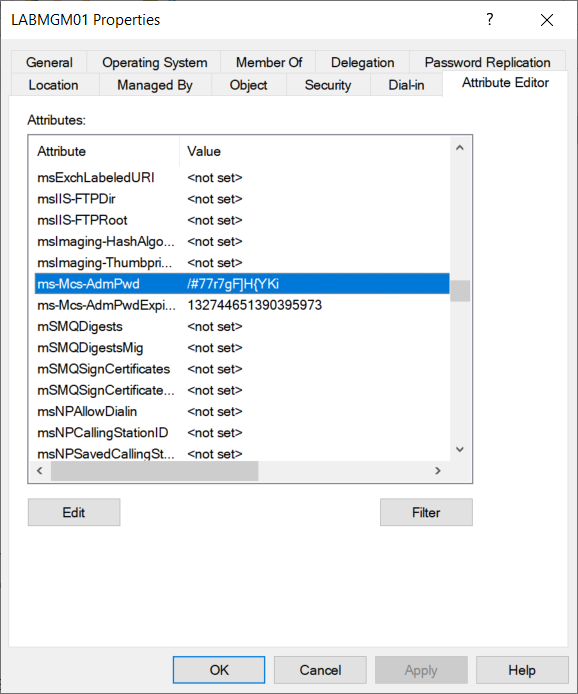
We can also find the same information through the Active Directory Users and Computers snap-in (dsa.msc). Under View make sure Advanced Features is enabled. Locate the appropriate computer object, and view its Properties. In the Attribute Editor tab locate the two attributes used by LAPS.
To easiest way of retrieving LAPS information through PowerShell is using the Get-AdmPwdPassword cmdlet, but this requires the LAPS module that might not always be present.
#With LAPS Module
Get-AdmPwdPassword -ComputerName LABMGM01

#Without LAPS Modules
Get-ADComputer -Identity LABMGM01 -Properties * | select  Name, ms-Mcs-AdmPwd, ms-Mcs-AdmPwdExpirationTime
Troubleshooting
LAPS logs all of its events in the Application Event Log and by default only logs errors on the local computer. If more logging is required create a new registry using the cmdlet below, adjust the value using the reference table.
New-ItemProperty 'HKLM:\SOFTWARE\Microsoft\Windows NT\CurrentVersion\Winlogon\GPExtensions\{D76B9641-3288-4f75-942D-087DE603E3EA}\' -Name ExtensionDebugLevel -Value 0
| Value | Meaning |
| 0 | Silent mode; log errors only When no error occurs, no information is logged about CSE activity This is a default value |
| 1 | Log Errors and warnings |
| 2 | Verbose mode, log everything |

