

Windows 365 is essentially a PC in the cloud that end-users can access from a variety of existing devices such as Windows, macOS, Linux, Android and iOS. There are two different variants of Windows 365, the Business SKU and the Enterprise SKU which is the main focus of this post (see the section below to understand the different SKU’s). Administrators can easily manage Windows 365 through Endpoint Manager (Intune) directly in the cloud. In this post we will walk through the steps required in order to get started with Windows 365.
Contents
- Business vs Enterprise
- Requirements
- Purchase and Assign Licenses
- Create an Azure Virtual Network
- Define On Premise Network Connection
- User Settings
- Create a Provisioning Policy
- Connecting to Windows 365
Business vs Enterprise
The Business SKU is for smaller organizations that want to deploy and manage up to 300 Cloud PC’s using Endpoint Manager. With the Business variant, smaller organizations do not need an Azure subscription or on-premise domain controller as everything is simply run inside the Microsoft cloud. The Enterprise SKU is much more complex and is targeted at larger organizations. With the Enterprise SKU organizations can create their own custom images (containing business apps), utilize vast amount of integrations, tools and security features.
There is a hidden price difference between the Business and Enterprise SKU’s as-well. When using the Business SKU’s end-users are given a monthly network quotas (based on the amount of virtual CPU’s), whereas the Enterprise SKU sends traffic through the on-premise connection. According to Microsoft’s own FAQ, Enterprise customers will be charged for all traffic that goes between Windows 365 and on-premise according to Azure bandwidth pricing. Most likely it wont be extremely expensive given regular use, but I would rather Microsoft used the quota system for Enterprise customers as well, with an option to purchase more data.
Microsoft offers an overview of the different SKUs, pricing and available specifications here.
| CPU | Outbound Data Quota |
| 1 | 12 GB |
| 2 | 20 GB |
| 4 | 40 GB |
| 8 | 70 GB |
Requirements
- Microsoft 365 Licenses – Windows 10 Pro/Enterprise , Microsoft Endpoint Manager, and Azure Active Directory P1.
- Windows 365 Licenses – For the Cloud PC itself.
- Azure Subscription – Owner Rights.
- Intune Administrator Rights.
- Working Endpoint Manager (Intune) setup.
- No enrollment restrictions for Windows.
- AD Connect with Hybrid Join (device synchronization) configured.
- Azure Express Route / VPN or other connectivity between Azure and on-premises.
- Currently the following regions are supported for Windows 365:
- US East
- US East 2
- US West 2
- US South central
- Asia Southeast
- Australia East
- Europe North
- Europe West
- UK South
- Canada Central
- India Central
- Japan East
- France Central
Windows 365 requires the following licenses Windows 10 Pro/Enterprise (Windows 11 when released later this year), Microsoft Intune and Azure AD Premium 1. To those familiar with Microsoft licensing you will know that all of these components are bundled together in Microsoft 365 F3, Microsoft 365 E3, Microsoft 365 E5, Microsoft 365 A3, Microsoft 365 A5, Microsoft 365 Business Premium, and Microsoft 365 Education Student. Although the bundle is recommended these licenses can be purchased individually.
Important: This guide will not cover the Hybrid Azure AD Connect setup or Site-to-Site connectivity between Azure and on-premises. Please verify that AD Connect is configured correctly as described in the guide from Microsoft here. For Site-to-Site setup see my earlier post on establishing Site-to-Site connection with Azure, using Windows Server 2019.
Purchase and Assign Licenses
Windows 365 Licenses can be acquired through a Microsoft Partner such as a CSP (Cloud Solution Partner) or purchased directly from Microsoft. In this example we will purchase the licenses directly from Microsoft in the Microsoft 365 Admin Center.
- Logon to the Microsoft 365 Admin Center with your administrative credentials.
- In the Navigation Menu on the left click Purchase Services under Billing.
- Click the Windows 365 category
- Select Windows 365 Enterprise
- Choose the appropriate specification and amount for the Cloud PC and click Buy
- In addition to the Windows 365 license each user also needs an appropriate Microsoft 365 license. Make sure to purchase any additional licenses as mentioned above.
Create a new Azure AD Group that will be used to assign policies later.
- In the Microsoft 365 Admin Center click Active Groups under Groups in the Navigation Menu.
- Click Add a Group
- Choose Security as the group type
- Provide a Name such as Windows 365 Users
- Click Create Group.
Creating a Azure Virtual Network
- In the Azure Portal search for Virtual Networks in the top search bar then press Create.
- On the Basics tab, specify the Azure Subscription to use and remember to choose a supported region (listed above).
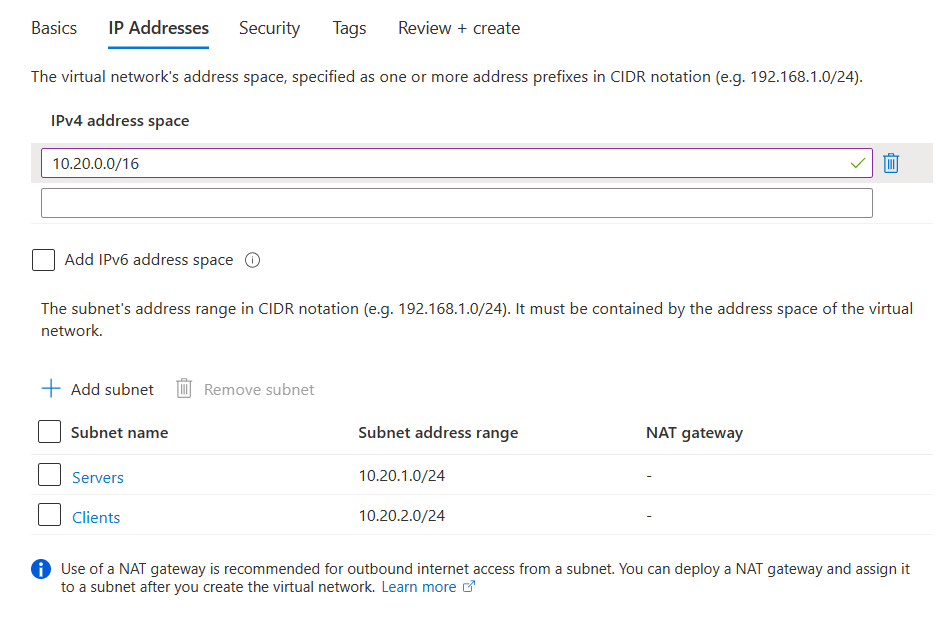
- Choose an IPv4 Address space on the IP Addresses tab. The chosen range should not be already be used within Azure or on-premise, as best practice is not to have overlapping ranges. For this simple example a range of 10.20.0.0/16 was chosen, a subnet for clients (for our Windows 365) and one for Servers (if we deploy any servers later) were also created.
- Complete the wizard and wait for the Virtual Network to be created.
- In order for Windows 365 devices to join the on-premises Active Directory domain we need to have connectivity between our newly created Azure Virtual Network and the on-premises infrastructure (domain controllers). To accomplish this a Virtual Network Gateway (VPN) can be deployed to our Azure Virtual Network. For detailed steps, see my post on creating a Site-to-Site connection between Azure and On-premises.
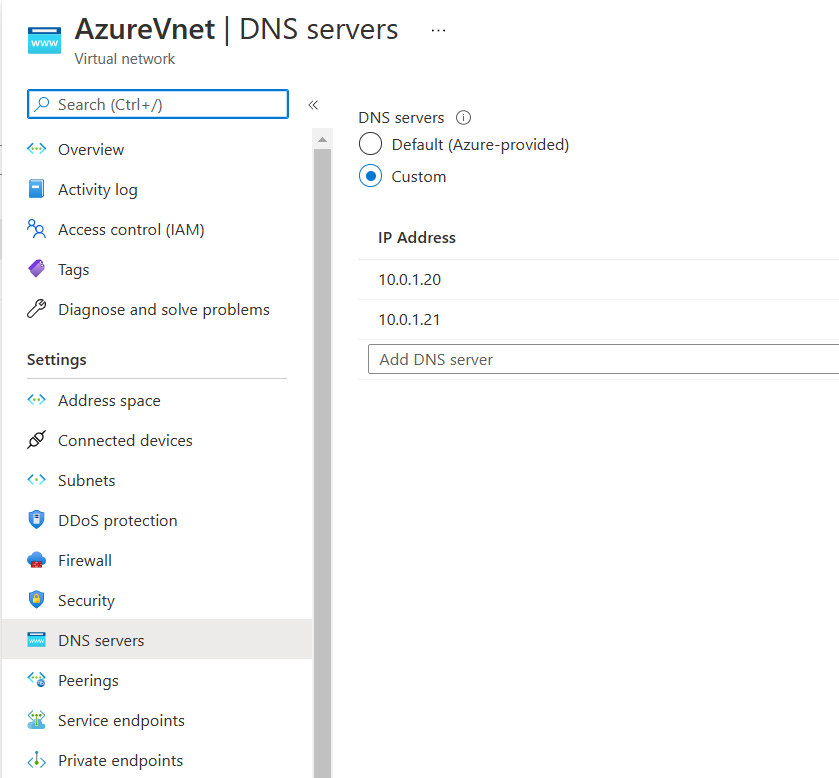
- In order for Windows 365 devices to resolve our on-premise DNS domain we also need to change the DNS Servers in the Azure Virtual Network. On the DNS tab select Custom and specify the IP addresses to your on-premise domain controllers.
Important: Make sure that the range specified in the Azure Virtual Network is defined in AD Sites and Services (especially if you have more than one site). Also make sure that routing and appropriate ports for joining the domain is opened between the Azure Virtual Network and on-premises domain controllers.
Define On Premise Network Connection
- In the Endpoint Manager Admin Center select Devices from the left hand menu then locate Windows 365 under Provisioning.
- Select the On-Premises Network Connection tab and then finally click Create.
- On the Network Details tab give the connection a name and specify the same subscription and Virtual Network that we created earlier. Since we created both a Client and Server subnet earlier, the Client subnet will be used for Windows 365.
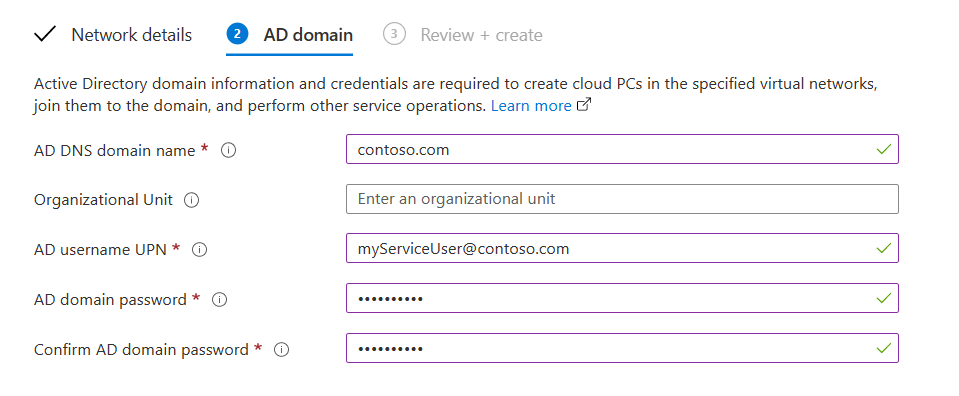
- For the AD Domain tab, we need to specify our on-premise domain information.
AD DNS Domain Name: the name of your on-premise domain.
Organizational Unit: I would recommend specifying an OU that contains clients (or make a new one for Windows 365) even though it is not required. Remember that this OU also has to be configured for synchronization on your Azure AD Connect server.
AD Username UPN: Specify a user that has permissions to join devices to the domain, this should ideally be some kind of service user.
AD Domain Password: Password for the service account above.
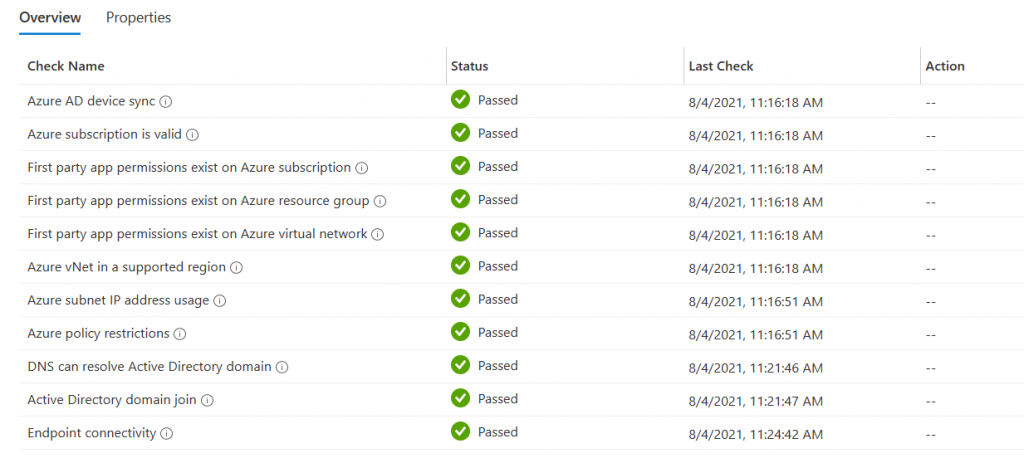
- Once the On-premise Network Connection has been defined, Endpoint Manager will start verifying connectivity (takes a few minutes). Once completed we can verify our setup and review any issues. On some of my earlier attempts the Azure AD Device sync gave warnings but I verified the AD Connect setup and found no errors and deployment went fine.
Tip: The checks do not always give adequate information for troubleshooting. To verify network connectivity deploy an Windows 10 virtual machine in Azure to the Clients subnet, then try joining that machine to the on-premise domain manually.
User Settings
There is only a single User Setting to configure as of now and that is Local Admin access. More options might become available in the future.
- In the Windows 365 blade select the User Settings tab, then click Create
- Set Enable Local Admin to on or off depending on your needs. For this example the setting was set to On.
- Assign the setting to the same security group we created earlier.
Create a Provisioning Policy
- In the Windows 365 blade select the Provisioning Policies tab, then click Create.
- On the General tab give the Provisioning Policy a Name and select the on-premises network connection. Note that the on-premises network connection will only be available after the connectivity checks have passed.
- Then on the Image tab specify the image to use. It is possible to create your own image but Microsoft recommend using one of the pre defined images. For this example the Windows 10 Enterprise + Microsoft 365 Apps 21H1 image was selected.
- On the Assignments tab, assign the Provisioning Policy to the security group we created earlier. Users in the applicable group need to have licenses assigned.
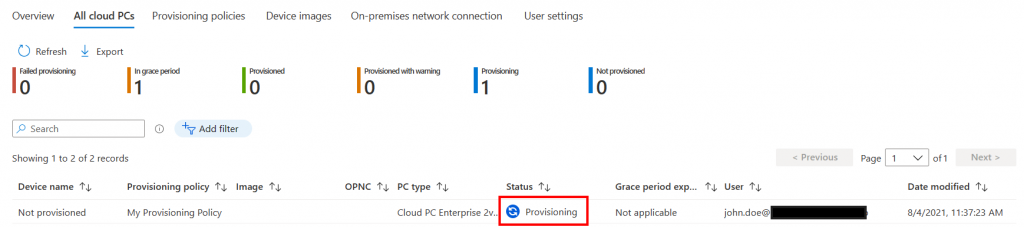
If done correctly the provisioning policy should now start spinning up Windows 365 devices for the users in our security group. Note that the provisioning can take as much as 60 minutes (sometimes longer) to complete.
Connecting To A Windows 365 Device
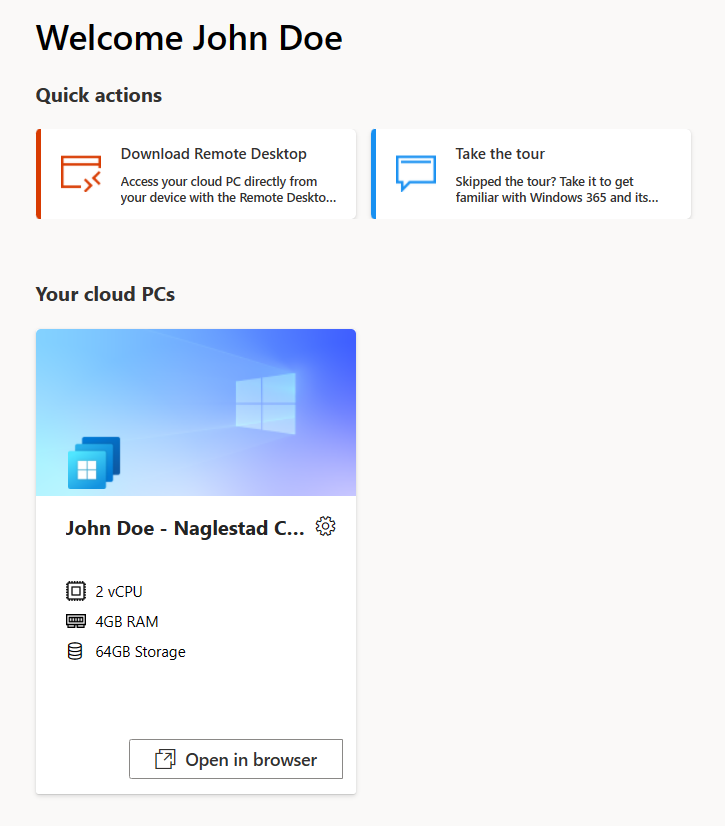
Once the Windows 365 device has been provisioned users can access their Windows 365 device like this:
- Sign-in to the Windows 365 Portal
- Under Quick Actions click Download Remote Desktop and select the appropriate platform. Windows 365 can also be used directly in the browser but for the best experience the Remote Desktop application is recommended.
- Launch the Remote Desktop application once it has been installed. Click the Subscribe button and login using the end-user credentials.
- The Windows 365 device will take a few minutes to get ready on the initial logon.
- Once at the desktop the end-user will be able to access both cloud and on-premise resources.


